

I still remember standing in my bathroom with clippers in my hand, staring at myself in the mirror, wondering if I was about to make the biggest mistake of my life. That was the night of my big chop. I’d spent years fighting with relaxers and flat irons, chasing a texture that just wasn’t mine, and I finally hit a wall. So I cut it all off.
What nobody warned me about was the prt that came after. Growing out short natural hair is its own adventure, and honestly, it took me almost a year of trial and error to figure out which styles actually worked for my curls, my schedule, and my patience level (which, some mornings, is very low).
So this isn’t some list I pulled off a Pinterest board. These are the ten styles that got me through awkward growth phases, humid summers, job interviews, and lazy Sundays. I’m also throwing in the mistakes I made along the way, because honestly, those taught me more than any tutorial ever did.
Why I Stopped Fighting My Curls?
For the longest time I thought short natural hair meant limited options. I couldn’t have been more wrong. Once I stopped trying to stretch my curls into something they weren’t, styling actually got easier and faster. My mornings went from twenty minutes of frustration to five minutes of just working with what I had.
A few things clicked for me pretty quickly:
- My hair grew faster once I stopped over-manipulating it
- I stopped burning my ends with heat
- Wash day stopped feeling like a chore
- I actually started liking how my curls looked in pictures
If you’re on the fence about embracing your texture, I promise the learning curve is worth it.
The Routine That Made Everything Else Possible:
Before I get into the styles themselves, I have to talk about the boring stuff, because none of these looks work well on hair that’s dry and neglected. I learned that the hard way after a Bantu Knot-Out turned into a frizzy mess because my hair wasn’t properly moisturized going in.
Washing: I switched to a sulfate-free shampoo and stretched my wash days to about once a week. Washing too often was drying my scalp out and making my curls rebel.
Moisture: This became non-negotiable. Leave-in conditioner, a curl cream, and a lightweight oil on top became my holy trinity. Curly hair loses water fast, so skipping this step shows up almost immediately as frizz and dullness.
Sleep protection: I used to wake up with half my style smashed flat until I started sleeping with a satin bonnet. Cotton pillowcases were quietly ruining every hairstyle I worked hard on the night before.
Okay, now let’s get into the actual styles.
1. The Teeny Weeny Afro (TWA):

This was my first style, mostly because it was my only option right after the chop. I was terrified it would look boring, but it ended up being one of my favorite phases.
What surprised me was how little effort it took. Some mornings I’d just pat a little curl cream through it, scrunch it with my hands, and walk out the door. If your hair is type 4A, 4B, or 4C, this style lets your natural pattern do all the work without you fghting it.
What actually worked for me: applying product to soaking wet hair, not just damp hair. The extra water helped the curls clump instead of standing up in every direction.
This is genuinely the easiest style on this entire list, and it’s a great confidence builder if you’re new to your natural texture.
2. Finger Coils:

I’ll be honest, my first attempt at finger coils looked more like frizzy question marks than actual coils. It took me about four tries to get the technique down.
The trick I eventually figured out was working with small sections, smaller than I thought I needed, and making sure each section was fully saturated with a curl-defining gel before wrapping it around my finger. Rushing this step is where most people (myself included) go wrong.
Once I got it right, the coils lasted almost a week and looked freshly done the entire time. I wore this style to two job interviews and a wedding, and it held up beautifully in every setting.
Lesson learned: don’t touch the coils util they’re 100% dry. I ruined a perfectly good set by getting impatient and separating them too early.
3. The Mini Twist-Out:

This one became my go-to for date nights and anytime I wanted volume without much effort. Two-strand twists on damp hair, left to dry completely, then gently pulled apart.
My biggest mistake here was twisting my hair when it was still dripping wet. It took forever to dry and I ended up leaving the house with half-dry twists more than once, which flattened the whole style by evening.
Now I twist on hair that’s damp but not soaking, and I use a hooded dryer or just plan ahead and let it air dry overnight. The payoff is worth the planning. Fluffing the roots with a hair pick afterward gives it that soft, full look that photographs really well.
4. The High Afro Puff:

If I had to pick one style for days when I genuinely do not have time to think, it’s this one. A satin scrunchie, a quick gather at the crown, and I’m out the door in under three minutes.
I used to pull my hair too tight trying to get a smooth look, and within a few months I noticed some tension around my hairline. That scared me into being gentler. Now I use a soft headband to smooth things down instead of pulling the ponytail tighter, and my edges have thanked me for it. A pair of gold hoops turns this from “I’m in a rush” to “I planned this” instantly.
5. Flat Twist Frohawk:

This is the style I wear when I want people to actually comment on my hair. It looks far more complicated than it is, which honestly is the best kind of hairstyle.
The sides get flat twisted up toward the center, and the middle stays loose and full. My first attempt had twists that were way too thick, which made the whole thing look bulky instead of sleek. Thinner, neater sections along the sides make a huge difference in how polished the final look feels.
I wore this to a graduation and got asked thee times who did my hair. It was just me, a mirror, and about twenty-five minutes.
6. Wash-and-Go (Shingling Method):
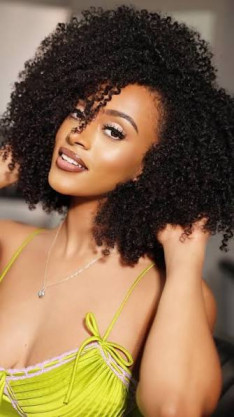
I was skeptical about this one for a long time because my first few attempts turned into a frizzy halo by noon. The shingling method changed everything for me. You work curl cream or gel through small sections of hair while it’s still dripping wet, letting each section clump on its own instead of piling product on dry, tangled hair.
The biggest change I made was switching from air drying to diffusing on low heat. Air drying alone left my roots looking flat and stretched, while diffusing gave me shrinkage in the best way, tighter, more defined curls with way less frizz. This became my everyday style once I stopped rushing the application step.
7. Bantu Knots:

I love this style for two reasons: it looks great on its own, and it sets up a Bantu Knot-Out that gives you stretched, voluminous curls a few days later. My first set of knots kept unraveling because I wasn’t twisting the sections tightly enough before wrapping them.
Moisturizing each section thoroughly before twisting made a noticeable difference. Dry hair just doesn’t hold a knot shape the same way.
I usually wear the knots themselves for a night or two, then unravel them for the knot-out. It’s basically two hairstyles for the price of one styling session.
8. Short Tapered Cut:

This is the style my stylist talked me into when I said I wanted “something low maintenance but still cute.” She was right. More volume on top, gradually shorter on the sides, and it flatters pretty much every face shape I’ve seen it on.
The upkeep is honestly minimal. A little curl cream, a touch of edge control if I’m feeling fancy, and I’m done. This one is great if you’re someone who wants to look put together without spending real time on your hair each morning.
9. Flat-Twisted Front with Puff:

This became my favorite “I want to look a little extra without a lot of effort” style. A few neat flat twists across the front, and the rest gathered into a sft puff at the back.
My early attempts had twists that were uneven in size, which threw off the whole look. Sectioning with a rat-tail comb before twisting fixed that problem almost instantly. Precision in the parting really does make or break this style. I wore this to church more times than I can count, and it always felt a little more intentional than a regular puff.
10. Comb Coils (Starter Loc Style):

Comb Coils are both a stylish standalone hairstyle and the foundation for traditional locs. Using a fine-tooth comb, small sections of damp hair are twisted into neat, uniform coils across the head. The finished style creates beautiful texture while encouraging the hair to remain organized and defined. For those considering a future loc journey, comb coils provide an excellent starting point.
Why It’s So Popular?
Comb Coils require very little daily styling once installed. They also protect natural hair while promoting healthy growth.
Best Hair Types:
Ideal for:
- Type 4A hair
- Type 4B hair
- Type 4C hair
- Dense coily hair
Styling Advice:
Maintain the coils by:
- Sleeping with a satin bonnet.
- Avoiding excessive touching.
- Keeping the scalp moisturized.
- Refreshing with a light spray moisturizer.
Best Occasions:
Suitable for:
- Everyday wear
- Professional environments
- Formal occasions
- Protective styling
Common Mistakes to Avoid with Short Natural Hair
Even healthy natural hair can become difficult to manage if common mistakes are repeated consistently.
Skipping Moisturizer
- Natural curls lose moisture quickly.
- Failing to moisturize regularly often leads to dryness, breakage, and excessive frizz.
Using Heavy Product Buildup
- Applying too many creams, oils, and gels at once can weigh curls down and reduce definition.
- Layer products sparingly and cleanse your hair regularly.
Tight Hairstyles
- Styles that pull too tightly around the edges may contribute to tension and unnecessary breakage.
- Always prioritize gentle styling.
Excessive Heat Styling
- Frequent use of flat irons and high-heat blow dryers weakens curl patterns over time.
Whenever possible:
- Air dry
- Diffuse on low heat
- Use heat protectant
Ignoring Regular Trims
- Healthy ends are essential for healthy growth.
- Schedule trims every 8 to 12 weeks to remove split ends and maintain the shape of your hairstyle.
Protective Styling Tips for Healthy Hair Growth:
Protective styling isn’t simply about convenience—it’s about preserving your hair’s health.
To get the best results:
- Keep your scalp clean.
- Moisturize consistently.
- Avoid leaving styles in too long.
- Sleep with satin protection.
- Give your hair breaks between protective styles.
- Massage your scalp regularly to encourage healthy circulation.
Healthy habits support stronger, more resilient curls over time.
Weekly Natural Hair Routine:
Creating a simple routine makes caring for short natural hair much easier.
Wash Day:
- Cleanse with a sulfate-free shampoo.
- Deep condition thoroughly.
- Detangle gently.
- Apply leave-in conditioner.
- Style while hair is damp.
Midweek Refresh:
Refresh curls by:
- Lightly misting with water.
- Applying a curl refresher or leave-in conditioner.
- Sealing moisture with a few drops of lightweight oil.
Night Routine:
Protect your hair by:
- Wearing a satin bonnet.
- Sleeping on a silk or satin pillowcase.
- Pineappling longer styles when necessary.
These habits help preserve curl definition while reducing friction overnight.
Best Accessories for Short Natural Hair:
Accessories can instantly elevate even the simplest hairstyle.
Popular options include:
- Headbands:
Fabric and satin headbands add personality while keeping curls away from the face.
- Hair Scarves:
Colorful scarves offer endless styling possibilities while protecting delicate hair.
- Gold Hair Cuffs:
Perfect for flat twists, mini twists, and braids.
- Satin Scrunchies:
Gentle on natural curls while reducing breakage.
- Decorative Clips:
Pearl clips and minimalist barrettes add elegance without overwhelming the hairstyle.
Frequently Asked Questions
Which short natural hairstyle is easiest to maintain?
The Teeny Weeny Afro (TWA) and Wash-and-Go are among the easiest styles because they require minimal daily manipulation.
How often should short natural hair be washed?
Most people benefit from washing every 7–10 days, depending on product buildup, scalp condition, and lifestyle.
What products are essential for healthy natural hair?
A sulfate-free shampoo, moisturizing conditioner, leave-in conditioner, curl cream, and lightweight natural oil form the foundation of an effective natural hair routine.
Is protective styling good for short natural hair?
Yes. Styles like flat twists, Bantu knots, puffs, and comb coils help reduce manipulation while protecting the ends of the hair.
How can I reduce frizz naturally?
Maintain proper moisture, avoid touching your curls while drying, use satin pillowcases, and seal hydration with lightweight oils.
Can short natural hair still be versatile?
Absolutely. Short natural hair supports countless styles, from puffs and twist-outs to finger coils, frohawks, wash-and-gos, and protective twists.
Final Thoughts:
Short natural hair is proof that healthy hair can be both stylish and incredibly versatile. Whether you’re embracing your curls after a big chop, maintaining a Teeny Weeny Afro, experimenting with Finger Coils, or creating elegant Flat Twist styles, each hairstyle offers a unique way to celebrate your natural texture.
The Top 10 Natural Styles for Short Hair featured in this guide demonstrate that beautiful hair isn’t about length—it’s about health, confidence, and embracing what makes your texture unique. By focusing on moisture, gentle styling techniques, protective hairstyles, and consistent care, you can enjoy curls that remain soft, defined, and full of life throughout every season.
Remember that no single hairstyle works for everyone. Experiment with different looks, discover what complements your curl pattern and lifestyle, and don’t be afraid to let your natural texture shine. With the right products, regular maintenance, and healthy hair habits, your short natural hair can become one of your most beautiful and empowering features.