
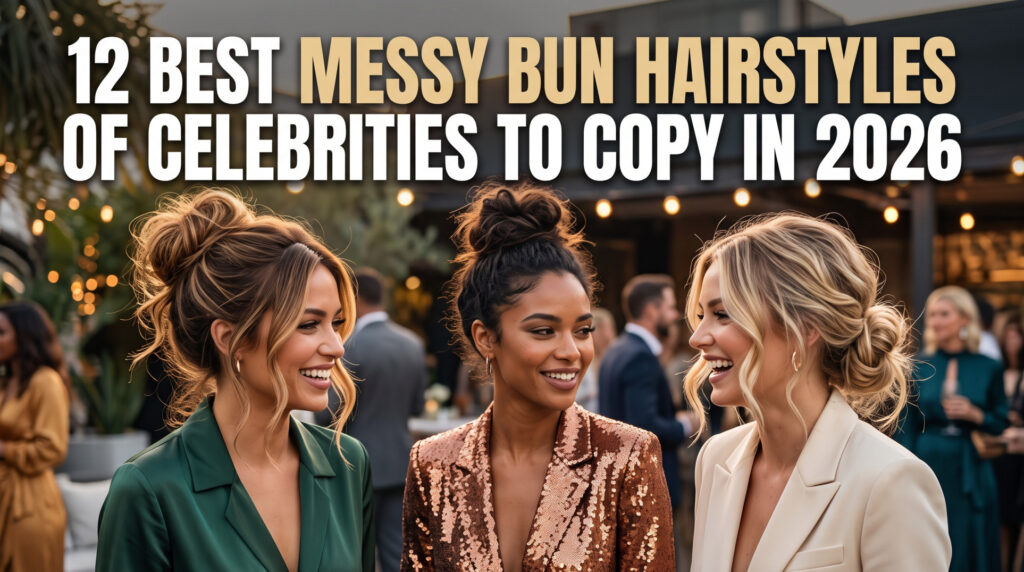
I used to think a messy bun meant “I gave up on my hair today.” That changed the first time I tried to recreate one before a friend’s engagement dinner. I had exactly fifteen minutes, a phone propped against the mirror, and a YouTube tutorial paused every ten seconds. Three bobby pins ended up on the bathroom floor and one section kept collapsing because I was twisting too tight. By the time I got the shape to hold, I understood something that no product label tells you: a messy bun isn’t a shortcut. It’s a technique that’s just good at hiding itself.
That’s exactly why it hasn’t gone anywhere. Red carpets, weddings, gym parking lots, the Zoom call five minutes before you remember to turn your camera on this style shows up everywhere because it adapts to almost any hair type, face shape, and occasion.
Below are twelve celebrity inspired takes on the messy bun, broken down by what actually makes each one different not just in the finished photo, but in the technique, the time it takes, and where it tends to go wrong.
Why This Hairstyle Refuses to Go Out of Style?
Hair trends come and go the slick-back bun, the claw clip stack, the “clean girl” ponytail but the messy bun keeps adapting instead of disappearing. A few reasons it’s stuck around:
- It takes five to ten minutes once you know the technique for your hair type
- It works on second, third, even fourth-day hair it often looks better with a little natural oil in it
- It reads as put-together without looking stiff
- It keeps hair off your neck without the “I’m just trying to survive summer” look of a plain top knot
If you’ve got a wedding, a work presentation, and a grocery run in the same week, this is one of the few hairstyles flexible enough to cover all three without changing your routine.
Getting the Base Right Before You Copy Anyone’s Look:
Before the specific styles, here’s what actually changes whether a messy bun holds up or falls apart in an hour.
Add grip first. A texture spray or dry shampoo worked into your roots and mid-lengths gives hair something to hold onto. Freshly washed hair is often too slippery for a loose twist if you’re working with clean hair, spray it in and let it sit for a minute before you start.
Pick your bun height on purpose. High buns read younger and more casual. Mid-height reads polished. Low buns read romantic. This one decision changes the personality of the whole look before you’ve touched a bobby pin.
Twist, don’t wrap. Wrapping hair tightly around itself gives you a smooth, controlled bun not a messy one. Twist loosely and let sections separate on their own as you go. This is the single biggest difference between “messy bun” and “regular bun having a bad day.”
Pin for structure, not tension. Bobby pins should hold the shape in plac, not pull at your scalp. If your head aches by lunchtime, you’ve overdone it take it down and redo it looser.
Pull face-framing pieces out last. Loosen a few strands around your hairline and temples after the bun is secured, not before. Doing it early just makes the whole shape collapse while you’re still working.
Once that foundation clicks, every style below gets easier the differences between them come down to placement, tension, and one or two technique choices, which is what I’ve tried to call out specifically for each.
The 12 Looks Worth Trying
1. Alessandra Ambrosio’s Volume First Bun:
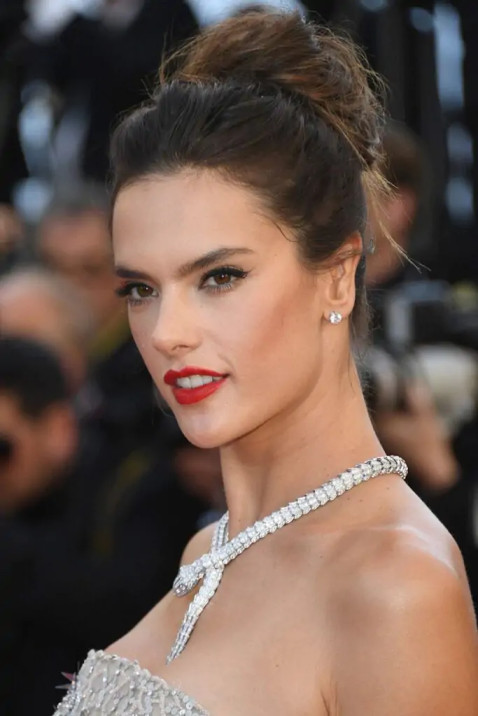
The defining feature here isn’t the bun itself — it’s the lift underneath it. This is the version to reach for when you want something that reads well in photos without looking overworked.
How to get it:
- Tease just the crown section for lift — two or three light backcombing strokes is enough
- Gather hair into a medium-high ponytail
- Twist loosely into a bun, letting the ends separate rather than tucking them flat
- Pin for structure, leaving a few soft pieces loose around the face
- Set with a flexible-hold spray, not a stiff-hold formula — stiff hold flattens the volume you just built
Time: About 8 minutes once you’re comfortable with the teasing step.
Good for: Weddings, holiday parties, anything with photos involved.
2. Jennifer Lopez’s Sleek-Meets-Undone Bun:
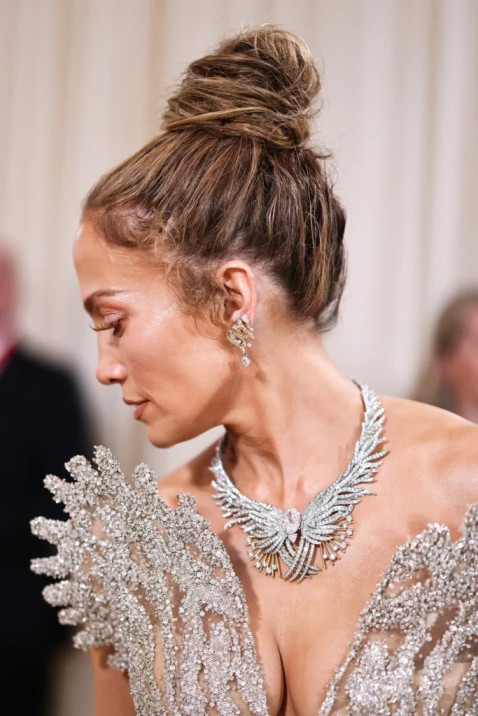
The contrast is the whole point: smooth sides, textured bun. This is a good one to learn first because the technique is simple even though it takes a little practice to get the sides genuinely smooth.
How to get it:
- Run a light styling cream through the top and sides, then smooth with a fine-tooth comb
- Pull into a high ponytail, checking the sides in a mirror before you secure it
- Twist loosely rather than wrapping tight
- Let one or two pieces fall near the face
- Touch up any flyaways at the part line with a small amount of leftover cream on your fingertips
Time: About 10 minutes — most of it goes into the comb-through.
Good for: Work meetings that turn into dinner plans.
3. Taylor Swift’s Off Center Romantic Bun:
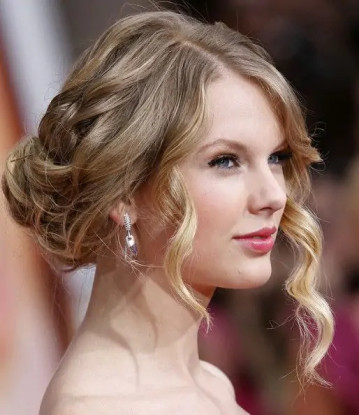
This one is about placement more than technique. A deep side part and an off-center bun reads intentional in a way a centered one doesn’t.
How to get it:
- Create a deep side part
- Gather hair toward one side near the nape
- Curl two or three face-framing pieces separately before you twist the bun — do this first, not last
- Twist the rest into a low bun on that side
- Pin loosely enough that the curled pieces can move
Time: About 15 minutes, mostly for the curling step.
Good for: Garden parties, bridal showers, dinners where you want soft rather than sharp.
4. Selena Gomez’s Low, Center Part Bun:
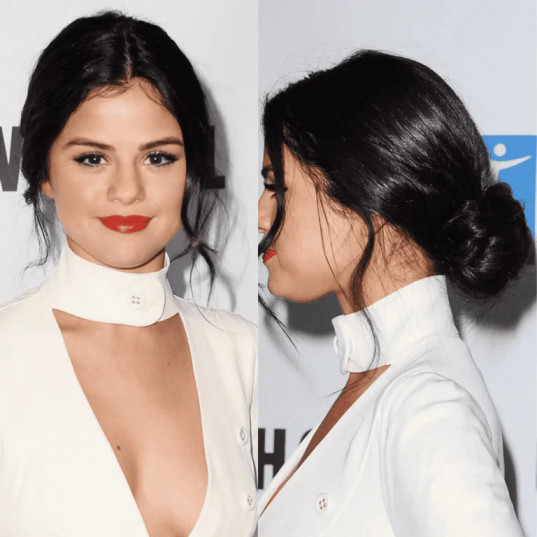
The most symmetrical option on this list, and genuinely one of the fastest no teasing, no curling, no side-specific styling.
How to get it:
- Center part
- Gather hair low at the nape
- Twist gently this one holds shape with less tension than most of the others
- Leave wispy pieces near the cheeks and jaw without curling them
Time: Under 5 minutes.
Good for: Brunch, errands, casual office days, or any morning you’re short on time.
5. Zendaya’s Textured Top Knot:
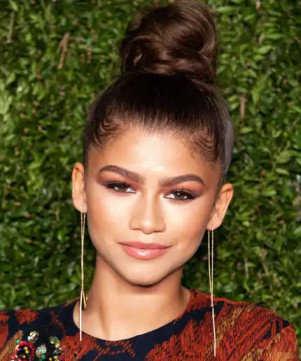
The boldest option here, and the one where “messy” is doing the most work. The goal is closer to sculptural than tidy.
How to get it:
- High ponytail at the crown
- Backcomb the ponytail itself (not just the roots) for real volume
- Twist loosely and let pieces stick out rather than smoothing them down
- Finish with texture spray worked directly into the bun, not just sprayed on top
Time: About 12 minutes. Good for: Concerts, streetwear outfits, anywhere you want the hair to do some of the talking.
6. Ariana Grande’s Everyday Casual Bun:
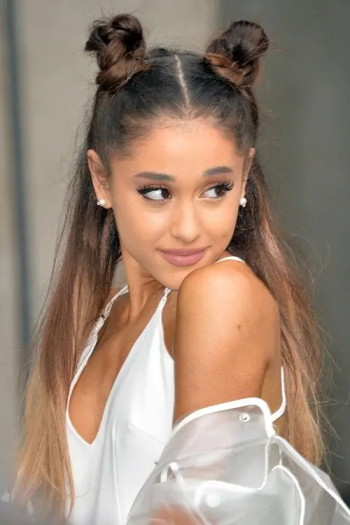
A relaxed version of a high ponytail rather than a tre updo the fastest style on this list to repeat daily.
How to get it:
- High ponytail
- Twist loosely so sections separate naturally
- Wrap the twisted length around the base and secure with the elastic first, then one or two hidden pins
- Pull a few wispy pieces loose at the crown and hairline
Time: Under 5 minutes. Good for: School runs, coffee runs, weekend errands.
7. Blake Lively’s Low-and-Full Bun:
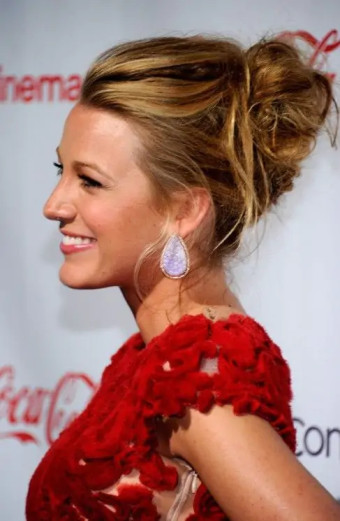
Lower than most on this list, with a rounder, fuller shape that photographs well from the side worth knowing if you’ll be seated for photos.
How to get it:
- Deep side part
- Low ponytail
- Twist into a relaxed bun, then gently pull the outer edge of the twist outward with your fingers to add width
- Loosen face-framing pieces last
Time: About 10 minutes.
Good for: Dinner dates, weddings, cocktail hours.
8. Hailey Bieber’s Minimalist Low Bun:
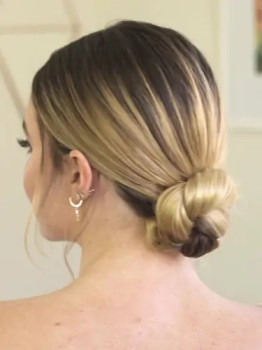
No volume tricks, no teasing this one is about clean proportions rather than texture, so it needs smoother hair than the others on this list.
How to get it:
- Center or slightly off-center part
- Smooth a drop of hair oil through the lengths before you gather
- Gather low, twist loosely
- Add just one or two soft pieces near the temples more than that starts to look undone rather than minimal
Time: About 6 minutes.
Good for: Airport days, business casual, any day you want to look put-together without visible effort.
9. Rihanna’s Oversized Statement Bun:
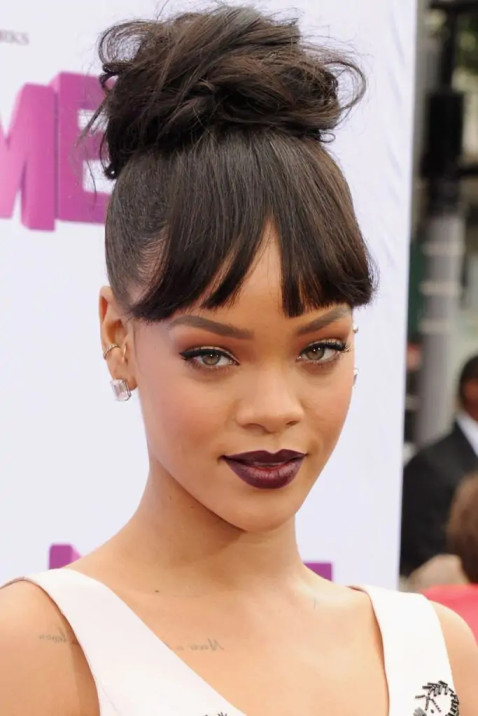
The most product and volume intensive style here. It needs more hair (or a bun insert) to look right than most of the others.
How to get it:
- High ponytail
- Backcomb generously at the base for volume
- Wrap loosely into an oversized bun without smoothing individual pieces
- Finish with a volumizig spray focused at the roots, not the ends
Time: About 12 minutes.
Good for: Evening events, holiday parties, anywhere you want visible drama.
10. Margot Robbie’s Understated Classic Bun:
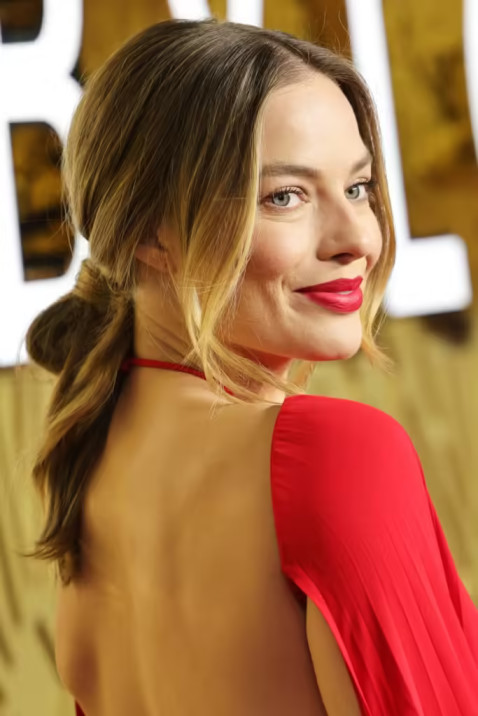
The most “goes with everything” option on this list — low, soft, and quietly put together rather than styled to stand out.
How to get it:
- Low ponytail at the nape
- Twist gently, without backcombing
- Secure with pins placed close to the scalp for a flatter finish
- Loosen a few strands around the ears and face
Time: About 8 minutes.
Good for: Formal dinners, business meetings, weddings where you don’t want to compete with the bride’s hairstyle.
11. Gigi Hadid’s High-Fashion Bun:
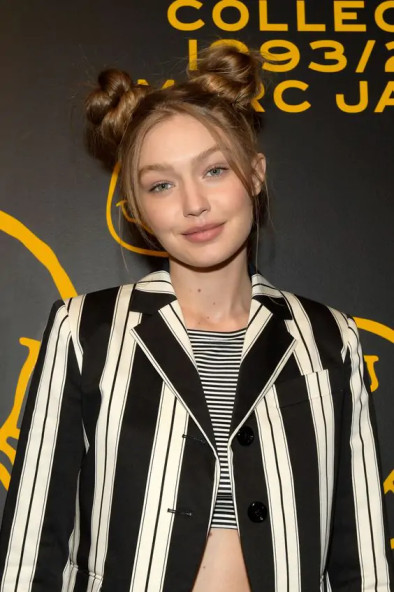
Editorial rather than red-carpet high, imperfect on purpose, and built to look a little unfinished even in a finished photo.
How to get it:
- High ponytail
- Tease heavily for volume more thn any other style on this list
- Wrap into an oversized bun without smoothing it down
- Secure loosely and let texture fall outward rather than pinning it flat
Time: About 15 minutes.
Good for: Photoshoots, fashion events, anywhere you want the hair to feel like a statement piece.
12. Sienna Miller’s Boho Low Bun:
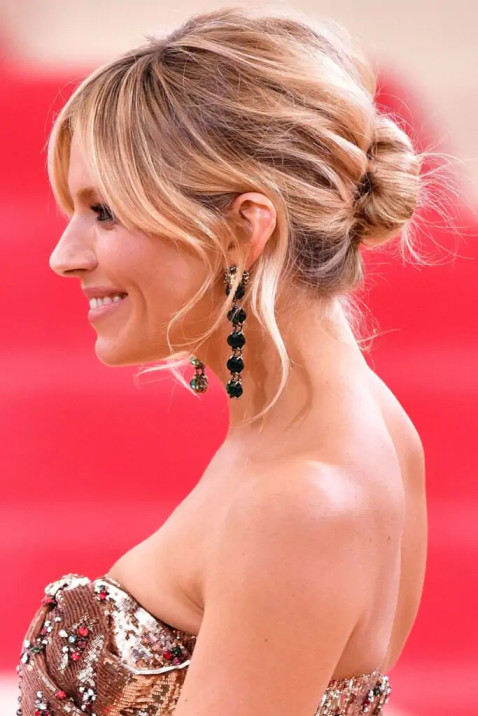
The one style here built to survive weather wind and humidity actually help this look rather than ruining it.
How to get it:
- Curl hair loosely first, in large sections
- Gather into a low ponytail once the curls have cooled
- Twist gently into a relaxed bun
- Pull out a few wispy pieces and mist lightly with texture spray
Time: About 18 minutes, mostly for the curling.
Good for: Outdoor weddings, vacations, everyday wear when you want a softer finish.
Accessories Worth Actually Owning:
A few accessories genuinely change how these styles hold up and photograph:
- Silk or satin scrunchies : gentler on hair than plain elastics, and they don’t catch light the way plastic ones do in photos
- A solid set of bobby pins : cheap ones slip within an hour; a slightly better set holds through a full event
- A couple of pearl or metallic pins : turn a casual bun into an evening-ready one in seconds without redoing the whole style
- A small hair comb :useful for the sleeker styles (Jennifer Lopez’s, Hailey Bieber’s) when you want polish without starting over
Keeping It Together All Day:
The most common question is how to make a messy bun survive a full workday, a wedding, or a flight. A few things that actually make the difference:
- Start on day-two or day-three hair when possible freshly washed hair is too slippery to hold a loose twist for long.
- Don’t skip the pins in favor of just an elastic. The elastic holds the ponytail; the pins are what actually hold the shape of the bun.
- Avoid overtightening. Beyond being uncomfortable, it flattens the volume you built earlier in the process.
- Finish with a light, flexible hairspray rather than a stiff-hold formula stiff hold fights the “undone” texture you’re going for and can make the bun look frozen instead of soft.
Mistakes I Made So You Don’t Have To
Pulling every section too tight, which gives you a smooth ballerina bun instead of a messy one the twist step is where this usually goes wrong.
Overloading with product before twisting, which makes hair heavy and harder to shape.
Skipping texture spray on freshly washed hair and wondering why the bun kept sliding loose within the hour.
Forgetting the face-framing pieces, which are what make the whole look feel intentional instead of just “hair in a bun.”
Piling on too many accessories at once one or two statement pieces is plenty; more starts to look cluttered rather than styled.
A Few Quick Questions:
Does this work on straight hair?
Yes, though straight hair generally needs more texture spray and a bit more backcombing than wavy or curly hair to hold the same shape.
Can shorter hair still do this?
Shoulder-length hair works fine for a smaller, looser bun the Selena Gomez and Ariana Grande styles are the easiest to adapt. Extensions or a small bun insert help if you want more volume with shorter length.
Which style is safest for a formal event?
Jennifer Lopez’s sleek version, Margot Robbie’s classic low bun, or Taylor Swift’s romantic side bun are the easiest to dress up and the least likely to loosen mid-event.
How do I add volume without teasing my whole head?
Focus backcombing at the crown only, then smooth the top layer over it before you twist this is the same technique used in the Alessandra Ambrosio and Rihanna styles above, just at different intensities.
Which of these holds up best in humidity or wind?
Sienna Miller’s boho low bun and Margot Robbie’s classic low bun are the most forgiving both rely on gentle tension rather than smoothness, so movement in the hair reads as intentional rather than as the style falling apart.
Final Thoughts:
The technique differences between these twelve styles come down to a handful of variables: bun height, part placement, how much (if any) backcombing you do, and how tightly you twist. Once those four things click, switching between looks is less about memorizing twelve separate routines and more about adjusting the same base technique.
Start with whichever style matches how much time you actually have that morning Selena Gomez’s or Ariana Grande’s if you’re short on time, Gigi Hadid’s or Sienna Miller’s if you’re not. From there, the rest is mostly repetition.