

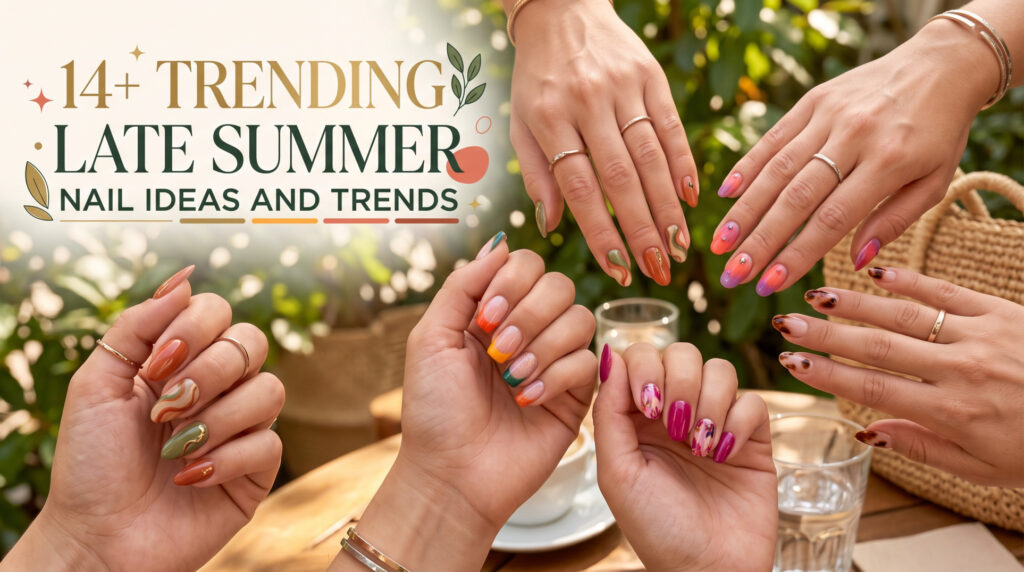
I was standing in line at my nail salon two weeks ago, scrolling through my camera roll trying to decide what to show my tech, when the woman next to me leaned over and said, “Okay but what even IS the color right now?” I didn’t have a clean answer for her. August nails aren’t really “one color” this year. They’re this beautiful mash-up of beach vacation brights and cozy sweater neutrals, and once I actually sat with that idea, it made a lot of sense.
I’ve been getting my nails done regularly for about six years now, mostly gel with the occasional dip powder phase (never again, long story). Every August I go through the same debate. Do I hang onto my coral and citrus tones for a few more weeks, or start easing into the plums and ambers I’ve been eyeing since July? This year I stopped fighting it and tried both. Some looks were amazing. One was a genuine diaster involving a magnetic gel polish and me not owning the right magnet. More on that below.
So instead of a generic trend list, I wanted to walk through what actually worked, what I’d skip, which ones you can do yourself, and which ones you need to leave to a professional.
Quick list if you’re skimming: Micro French, Cute Coral, Citrus & Berry Almond, Creamy White French Tips, Amber Floral & Molten Gold, Glam French Tips, Blue Evil Eye & Retro Swirl, Summer Swirl, Peridot Velvet, Sunset Aura Mix, Cherry Smash Up, Deep Plum Almond, Strawberry Stripe & Floral Mix, and Lavender Glass. Full breakdown of each one below, including which ones are DIY-friendly.
Why August Nails Feel Different From Every Other Month?
Spring nails are pretty predictable, pastels and florals. Winter leans into deep jewel tones and glitter. August sits in an odd in-between spot, and your nails end up reflecting that. You’re still going to the beach, still wearing linen, still sweating through the humidity, but you’re also side-eyeing pumpkin spice ads and thinking about sweater weather.
What I noticed over my last few appointments is that nail techs are leaning into that tension instead of picking a side. You’ll see a soft neutral base with a warm amber accent nail, or a creamy French tip that reads “elegant fall” but still feels fresh enough for a rooftop happy hour. It’s genuinely one of the more fun times of year to experiment because there’s no wrong answer.
Picking a Color That Actually Works on You:
I used to just pick whatever color looked good in the little bottle, which, lesson learned, is not how this works. Polish looks completely different in a two inch bottle than it does across ten nails under salon lighting.
- If you’re on the fairer side: I’ve had good luck with soft coral, milky white, and a sheer pink that almost looks like your nail but better. Lavender is having a moment too, and it’s genuinely flattering rather than costume-y.
- Medium skin tones: tend to glow with peach coral, terracotta, warm nude, and gold shimmer. My sister has this skin tone and berry pink has basically been her signature color for three summers running.
- Deeper skin tones: can carry the boldest shades on this list and make them look intentional instead of loud. Emerald, plum, burnt orange, chocolate brown, and metallic gold all pop in a way they just don’t on lighter skin.
None of this is a strict rule. I’ve seen every shade here look great on someone outside its “assigned” category. Treat it as a starting point, not a law.
Your actual lifestyle matters more than any trend chart. If you’re in an office five days a week, a French manicure or a clean neutral almond shape will serve you better than 3D florals that catch on your keyboard. Ask me how I know. If you’ve got a beach trip or festival coming up, that’s your green light to go loud with swirls, chrome, or a colorful French tip.
The Colors Everyone’s Actually Asking For Right Now:
Based on what I’ve seen in salons and what my nail tech tells me she’s booking most, here’s the honest shortlist for 2026:
- Coral pink — still everywhere, still flattering on almost everyone
- Creamy white — softer than the stark bright-white French tips from a few years back
- Amber — sunset-in-a-bottle warmth without going full autumn brown yet
- Berry — the first real hint of fall, bt still juicy and fresh
- Gold — usually an accent nail or chrome detail rather than an all-over color
- Peridot green — August’s birthstone color, and now a legit trend in its own right
Nail Shape Actually Matters More Than People Think
I used to treat nail shape as an afterthought and just default to whatever I already had going. That was a mistake, because the shape changes how a color or design actually reads on your hand.
- Almond: is the shape I keep coming back to and the one my tech says she’s shaping most often right now. It elongates the fingers and works for both minimal looks and detailed nail art, which is why it shows up as the recommended shape for most of the trends below.
- Squoval: (square with softened corners) is what I’d recommend if your nails are naturally short or prone to breaking, since it’s more durable than a pointed almond tip.
- Coffin: shape shows up a lot with the more artistic, longer designs on this list, like the amber floral or the aura mix, because the flatter surface gives a nail artist more room to work.
- Oval: is the safest, most universally flattering shape if you’re not sure what you want, and it’s low-maintenance to keep up between fills.
If you’re going to a salon for anything beyond a basic color, tell your tech your shape preference before they start on the design, not after. Shape gets set early, and changing your mind mid-appointment usually means starting over.
Get Your Nails Ready Before Any of This Works:
I learned this the hard way after showing up to a big appointment with dry, peeling cuticles and wondering why my seventy dollar manicure looked mediocre by day four. The design is only half the equation.
A few things that actually made a difference for me:
- Cuticle oil, every single day. I keep a rollerball one in my bag (CND’s Solar Oil is the one I reach for) and just swipe it on whenever I remember. It sounds small but it changed how my polish sits.
- Pick a shape that suits your actual nail bed, not just whatever’s trending. If your nails are naturally short, forcing a long almond shape usually means acrylic extensions, which is a bigger commitment than most people expect.
- Use a real strengthening base coat. I switched to OPI’s Nail Envy last year and stopped seeing the peeling I used to get after gel removal.
- Exfoliate your hands, not just your nails. A cheap sugar scrub in the shower once a week makes a manicure look ten times more expensive than it is.
Now for the actual designs. I’ve tried more than half of these myself, either at the salon or as a DIY attempt at home, so I’ll be straight with you about which ones are easy and which ones need a professional.
1. Micro French Manicure:

This is the one I get most often, because it’s basically foolproof. Instead of the thick white tip from the 2000s, it’s a super thin line, almost like someone traced your nail edge with a fine-tip marker. Over a sheer pink or nude base, it looks polished without looking overdone. It works well on short nails, which I appreciate since mine break constantly. If you’re doing this at home, a striping brush is non-negotiable. I use a Mundo de Uñas striping brush set. Trying to freehand a thin line with a regular polish brush is how you end up redoing three nails.
DIY difficulty: Moderate. Doable with the right brush and some patience.
2. Cute Coral Nails:
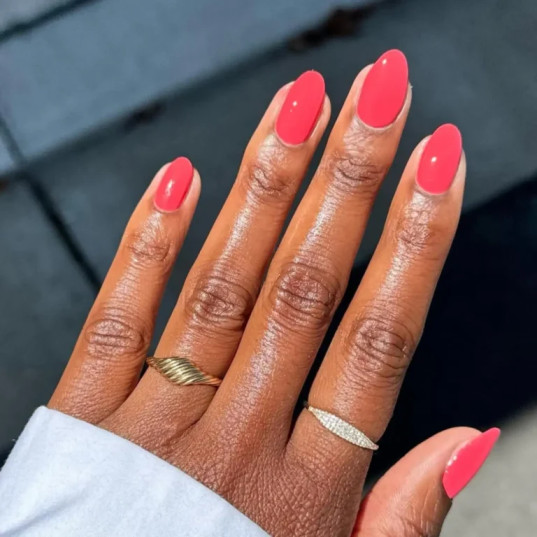
I wore this exact look for a friend’s bachelorette weekend and got more compliments on it than the outfit I’d planned for weeks. Glossy coral makes your hand look tan and healthy, even in early August when your actual tan has started fading. If you’re doing this yourself, go with two thin coats rather tn one thick one. Coral shades tend to streak if you rush the application.
DIY difficulty: Easy. Great for a first at-home attempt.
3. Citrus & Berry Almond Nails:

This is the “can’t decide” manicure, and I mean that as a compliment. Lemon yellow, orange, raspberry, and berry all on one hand, usually with each nail getting its own color. My tech did this freehand and it took about 45 minutes longer than my usual appointment, so budget accordingly if you’re booking it at a salon.
DIY difficulty: Hard. I’d leave this one to a professional unless you’re already comfortable blending multiple colors cleanly.
4. Creamy White French Tips:

Softer and warmer than the classic bright white tip, more ivory than copy-paper white. Paired with a milky nude base, it reads expensive without trying too hard. This has become my go-to for work because it photographs well on video calls, which is a strangely practical thing to care about but here we are.
DIY difficulty: Moderate. Same striping-brush technique as the micro French, just with a warmer white polish.
5. Amber Floral & Molten Gold August Nails:
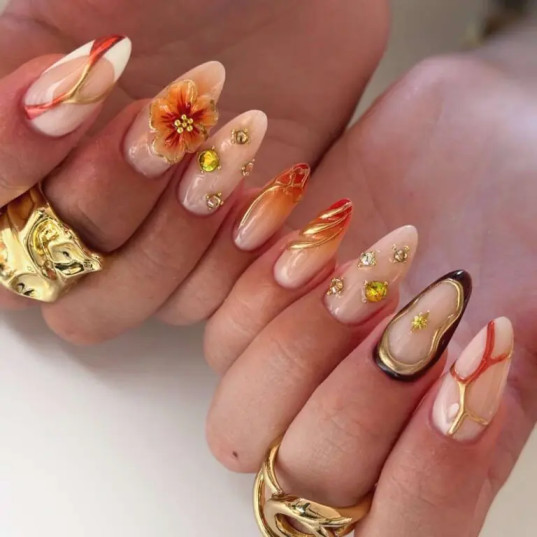
This is the design that made me want to be more of a “nail person.” Sculpted amber flowers, gold chrome swirls, sometimes tiny gems worked into the design. It’s a lot, in the best way, and it’s really meant for a special occasion rather than a random Tuesday.
I’d only book this if your tech does 3D nal art regularly. Ask to see her portfolio first. Not every salon does this well, and it’s not cheap when it’s done right, usually adding twenty to forty dollars on top of a standard gel manicure.
DIY difficulty: Very hard. This is a salon-only look for almost everyone.
6. Glam French Tips:
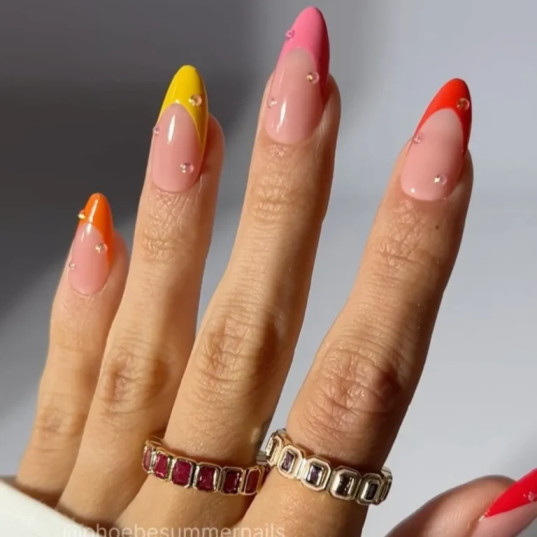
I tried a version of this for a friend’s birthday dinner and it ended up being one of my favorite “not too safe, not too loud” looks. The tips came in yellow, coral, hot pink, and cherry red over a sheer nude base, with a few tiny rhinestones placed near the cuticle rather than scattered across the whole nail, which kept it from looking cluttered. It reads as a French manicure at a glance, just a colorful one.
DIY difficulty: Moderate. The color part is easy, the rhinestone placement takes a steady hand or a small dotting tool.
7. Blue Evil Eye & Retro Swirl Nails:
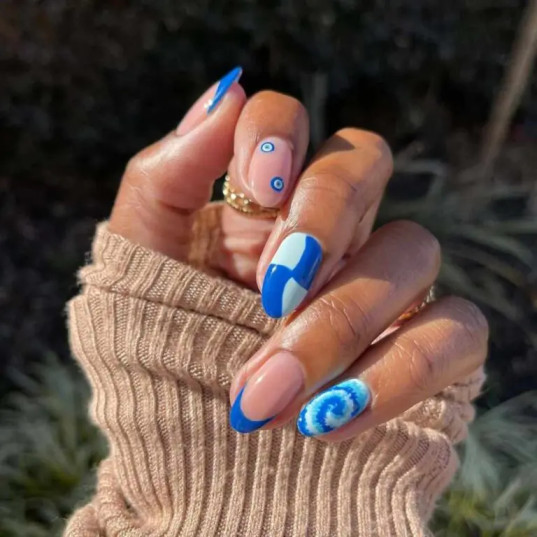
I was skeptical about this one going in, because evil eye nail art can look cluttered if it’s not done carefully. My tech kept the swirls loose and left some negative space around each eye motif instead of packing the whole nail, and that restraint is what made it work. Cobalt blue against a soft nude base reads as pretty cohesive, and it’s a nice break if you’re tired of orange-and-brown late-summer palettes.
DIY difficulty: Hard. The evil eye detail specifically needs a fine detail brush and a steady hand.
8. Summer Swirl Nails:
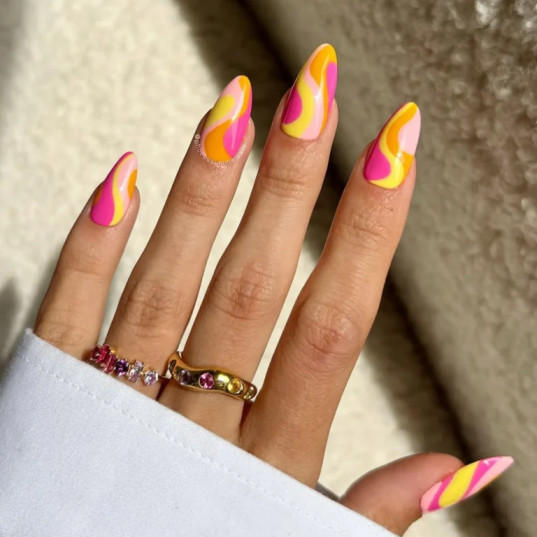
Soft flowing waves of pink, orange, peach, and yellow, with strong retro energy, almost like marble cake. This one is forgiving if your lines aren’t perfectly straight, which made it one of the easier “artsy” looks I tried at home with a dotting tool and a few polish colors I already owned. I used a toothpick to drag the colors into swirls before they set, which worked better than any actual nail tool I tried.
DIY difficulty: Easy to moderate. One of the better beginner nail-art projects on this list.
9. Peridot Velvet August Nails:

Here’s my disaster story. I bought a magnetic cat-eye polish online without checking that it came with the actual magnet tool, applied it, and just had a regular shiny green nail. No velvet effect, no shimmer movement, nothing. You need the magnet to pull the pigment into that cat-eye pattern before it cures. Once I got the right kit (Born Pretty sells a set with the polish and magnet together, which is what I’d recommend if you’re trying this at home), the effect was genuinely striking. Deep green with shifting shimmer as you move your hand. Worth the do-over.
DIY difficulty: Moderate, but only if you buy a proper magnetic polish and magnet set together. Buying them separately is how my first attempt failed.
10. Sunset Aura Mix Nails:

Aura nails have been building for a while, and this is the most striking version I’ve seen. Orange aura blending into cobalt blue with metallic linework and tiny pearls. My tech used a small makeup sponge to dab the color gradient before sealing it, which is the same basic technique behind mst aura nail looks. It photographs incredibly well, which matters if you’re doing this ahead of a vacation or an event you know you’ll be photographed at.
DIY difficulty: Hard. The sponge-blending technique takes practice to avoid muddy color transitions.
11. Cherry Smash Up August Nails:
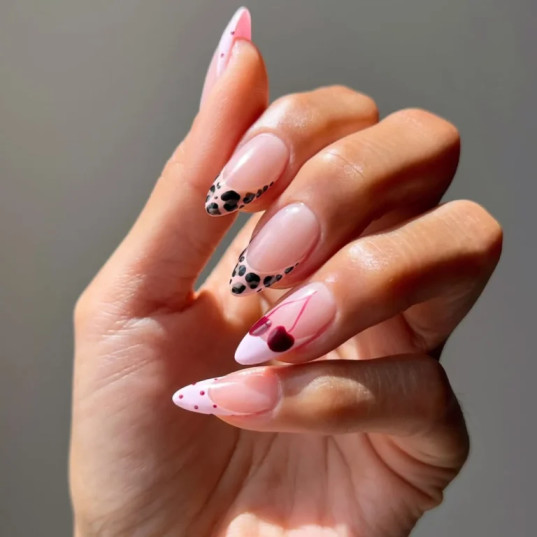
Tiny hand-painted cherries with black-speckled French tips over a glossy pink base. I tried the speckled tip part myself using a stiff, almost-dry brush flicked lightly over wet polish, and it came out better than expected on the first try. The cherries themselves were harder, mine looked more like berries than actual cherries, so I’d practice that part on paper first before committing to your nails.
DIY difficulty: Moderate. The speckled tips are genuinely easy. The cherry detail takes practice.
12. Deep Plum Almond Polish:
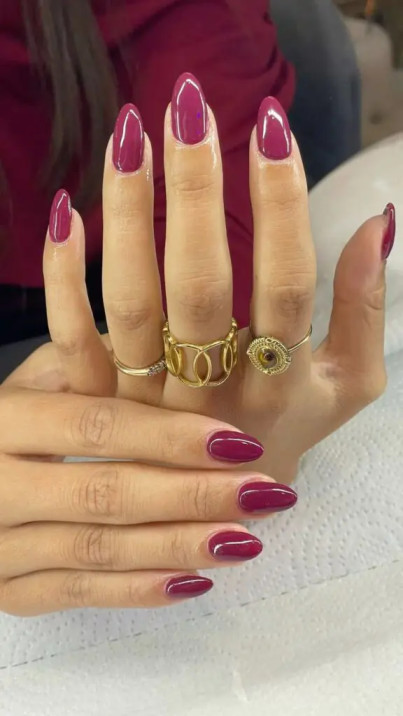
This is the easiest transition-to-fall color on the whole list, and it’s the one I’ve already repurchased for September. Rich, glossy, works with nearly every outfit, and it doesn’t scream “fall” the way a burnt orange might in mid-August.
DIY difficulty: Easy. Any decent formula in this shade applies evenly in two coats.
13. Strawberry Stripe & Floral Mix Manicure:
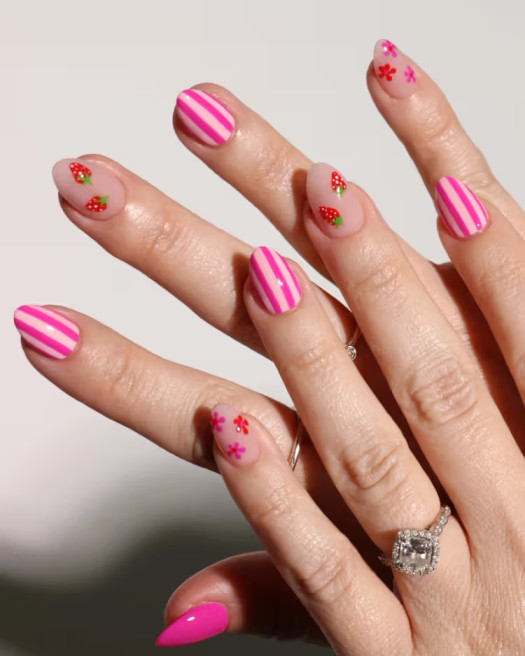
Pink stripes, tiny strawberries, and delicate florals over a sheer nude base, with each nail slightly different but somehow cohesive as a set. I did a simplified version of this myself by picking just two nails for the strawberry detail and keeping the rest plain nude with thin stripes, which kept the overall look from feeling too busy for everyday wear.
DIY difficulty: Moderate if you scale it back to one or two accent nails instead of doing all ten in full detail.
14. Lavender Glass Nails:

Soft lavender shimmer with a glass-like finish, sometimes with a butterfly accent nail. This is probably the most “wedding guest” option on the list, elegant and a little romantic without being loud. My tech achieved the glass effect using a specific top coat made for that finish rather than a reglar topcoat, so if you’re asking for this by name, mention “glass nail” or “jelly” finish specifically so your tech knows which product to reach for.
DIY difficulty: Hard. The glass finish depends on a specific top coat formula that isn’t in every basic polish kit.
Gel vs. Dip Powder vs. Regular Polish: Which One Fits Which Trend:
This is something I wish someone had explained to me years ago instead of me figuring it out through trial and error.
- Gel: is what I’d recommend for anything with fine detail, like the evil eye design, the cherries, or the striped French tips. Gel polish stays workable longer before curing under the lamp, which gives a nail artist more time to get thin lines clean.
- Dip powder: builds a harder, more durable nail, which is great for plain colors like the deep plum or the coral, but it’s a rougher base for delicate hand-painted art. My one dip powder phase ended because the surface texture made fine detail work look chunky.
- Regular polish: is the easiest for DIY attempts at home since it doesn’t need a UV lamp, but it chips faster, usually within four to six days for me, compared to two to three weeks for gel.
- Wear time, roughly: regular polish, four to seven days. Gel, two to three weeks. Dip powder, three to four weeks. Removal also differs. Gel and dip both need proper soak-off with acetone rather than peeling, which is worth asking your salon to do for you rather than attempting at home, since peeling off gel takes layers of your natural nail with it.
How I Keep a Manicure Looking Good Longer Than Four Days:
- Cuticle oil daily. I knw I already said it, but it’s the single biggest factor.
- Gloves for dishes and cleaning. Dish soap is brutal on gel polish.
- A fresh top coat every two or three days if you’re doing your own touch-ups.
- Stop using your nails to open packages. I say this as someone who still does it.
- Hand cream every night, no exceptions.
Mistakes I’ve Made So You Don’t Have To:
Picking a color because it looked great on someone else’s Instagram, not because it actually matched anything in my closet. Skipping the base coat because I was in a rush, which stained my natural nails yellow for weeks after. Going too intricate on all ten nails instead of just doing one or two accent nails, which ended up looking busy instead of intentional. Buying a magnetic polish without checking it came with a magnet. And forgetting that August is a transition month. Leaning too hard into either pure summer brights or full autumn browns tends to look a little out of step with the actual weather outside your window.
Quick Answers to Stuff People Actually Ask Me:
What’s the best August nail color?
Coral, creamy white, soft berry, amber, peridot green, and warm nude are the shades I keep coming back to and seeing on other people too.
Are French manicures still a thing in 2026?
Yes, just not the old-school version. Micro French tips and colorful French tips are what’s actually being requested at salons right now.
What nail shape is most popular right now?
Almond, by a wide margin. It’s flattering on almost every hand and works for both minimal and detailed designs.
Can I wear a dark color in August?
Absolutely. Plum, berry, olive, and amber all work fine in late summer, especially as the month goes on.
How long does a gel manicure actually last?
In my experience, two to three weeks before I start seeing noticeable growth at the base, though the polish itself usually stays chip-free the whole time.
Should I remove gel polish myself?
I wouldn’t. Peeling gel off at home takes layers of your natural nail with it. A proper acetone soak-off at a salon protects your nail bed far better.
Final Thoughts:
If there’s one thing I tok away from trying a bunch of these looks this year, it’s that August doesn’t ask you to pick a lane. You can wear coral to a pool party on Saturday and swap to a deep plum by the following weekend without it feeling like you’re rushing the season. That flexibility is what makes this month one of my favorite times to switch things up.
A few practical habits made a bigger difference than I expected. Bringing two or three reference photos to an appointment instead of describing a color out loud cuts down on miscommunication more than you’d think. Booking detailed designs earlier in the day, rather than a late afternoon slot, tends to get you a more careful result since your tech isn’t rushing through a full day of walk-ins. And asking your salon which polish system they’re using before committing to a look from a photo matters too, since gel, dip, and regular polish can all render the same shade slightly differently.
If you’re new to any of this and feeling a little overwhelmed by the options, it’s fine to start small. Pick one trend from this list, maybe the coral or the creamy white French tips since they’re the most forgiving, and build up to the more detailed looks once you’ve got a feel for what actually works with your day-to-day life. Nail trends are supposed to be fun, not stressful, and there’s no rule that says you have to try all fourteen in one summer.