

These November nail looks build on that balance. You’ll find understated French tips, playful animal prints, moody florals, and Thanksgiving designs, with options for short natural nails as well as longer statement shapes. Some are manageable with regular polish and a dotting tool; others are better taken to a nail artist.
For November 2026, there’s no need to label every seasonal favorite a brand-new trend. Tortoiseshell, plaid, and burgundy remain useful sources of autumn inspiration. Changing the scale of a pattern, mixing finishes, or leaving a little negative space makes those familiar ideas feel personal.
Before choosing, consider your routine. If you type, cook, or work with your hands, short rounded or squoval nails can accommodate plenty of detail without added length. For layered art or dimensional embellishments, ask your artist what’s realistic for your nail shape and maintenance preferences. Then choose the design you’ll enjoy wearing throughout the month.
1. Cheetah Colors:

You don’t need a full set of spots to borrow cheetah print’s appeal. This manicure stretches its brown-and-black palette across jelly color, opaque polish, French tips, and soft aura effects. The shared colors connect the different designs without making every nail identical.
Choose a translucent caramel or chestnut shade, an opaque chocolate brown, and black. Keep one feature dominant on each nail: a dark tip, a softly blended center, or a small patch of print. Repeating the same brown on several fingers keeps the mixed manicure intentional.
Short nails suit a simplified version with brown polish and two patterned accents. Longer almond nails offer more room for gradients and curved tips. If you’re recreating it yourself, skip the aura effect unless you have suitable tools; alternating sheer and opaque finishes still gives the manicure dimension. Pair it with camel knitwear or black accessories.
2. Olive and Gold Croc Nails:

Olive green and gold make a rich combination for November, especially when arranged in a crocodile-inspired pattern. The earthy base keeps the metallic detail from feeling overly festive, so the manicure works before and during the holiday season.
In the original article, nail artist and educator Marnae Orton recommended this pairing for its balance of sophistication and glamour. To keep that balance, choose a muted army green rather than a bright yellow-green, then use gold sparingly along the irregular outlines.
A detailed croc pattern is a good salon request. Bring a reference and specify whether you want flat painted lines or a raised texture, since those create different results. For an easier home version, use croc-pattern decals over olive polish. One or two accent nails also reduce the effort. The colors look especially cohesive beside cream sleeves, dark denim, and brushed-gold jewelry.
3. A Lush Mix:

Cherry cola gives this eclectic manicure a strong starting point. Red tortoiseshell, French tips, dimensional cherries, and zebra stripes bring different textures and patterns together, while the deep red base keeps the set connected.
The secret is restraint within the mix. Use cherry cola across several nails, introduce black and cream for the zebra detail, and reserve the cherry embellishment for one focal nail. Too many unrelated colors can make the individual designs compete rather than complement each other.
If you prefer short nails, trade the raised cherries for painted fruit or a tiny decal. You’ll retain the playful character without a bulky decoration near the nail’s edge. For a dressier interpretation, keep the French tips slim and the tortoiseshell translucent. Ask your artist about embellishment placement if you wear gloves frequently, since projecting details may catch on fabric during everyday wear.
4. Dual-Finish Berry Skittle Nails:

A skittle manicure uses a different shade on each nail, and berry colors make the idea especially wearable for fall. Think dusty raspberry, burgundy, mulberry, and deep plum rather than a collection of unrelated brights.
The original article highlighted Tara Haye’s preference for matte seasonal colors and Orton’s tonal crocodile designs. Combine those ideas by giving the berry shades a matte finish, then adding glossy croc markings or a shiny French edge. The contrast provides interest without introducing another color.
Test your selected polishes together before painting. If one looks noticeably cooler or brighter than the others, replace it with a shade that bridges the palette. For DIY application, let the color dry before adding the matte top coat, following the product directions. Save glossy detail for last. Keep cuticle oil on the surrounding skin rather than spreading it across the matte surface.
5. Red Ember Chrome Tips:

Red ember chrome tips trade icy silver for a warmer metallic effect. Picture a neutral base edged with coppery red or a deep, glowing crimson. The result offers a little evening shine while staying grounded in November’s palette.
Chrome doesn’t need a “new for 2026” label to earn its place here. What makes this version distinctive is the combination of warmth and placement: concentrating the reflective finish at the tip rather than covering the entire nail.
A narrow curved tip suits shorter nails, while a longer almond shape can carry a deeper sweep of color. For a salon appointment, specify red or copper-red chrome rather than simply requesting metallic tips. At home, a metallic red polish is a simpler alternative to powder systems. Follow the finish’s instructions carefully; chrome powders aren’t interchangeable, and some require a compatible gel base and curing process.
6. Red and Black Polka Dots:

A true red base with black polka dots is straightforward, graphic, and easy to adapt. It brings more contrast than a tonal autumn manicure, making it a good choice if muted browns and greens don’t feel like you.
For a cleaner result, decide on the dot size before starting. Small, evenly spaced dots create a restrained pattern; larger dots feel more playful and retro. Try the spacing on a practice surface first, then use a dotting tool with a light touch.
Allow the red polish to dry before adding black, and don’t overload the tool. Too much polish can leave raised blobs that take longer to dry. If a full patterned set feels busy, use dots on two nails and leave the rest solid red. Black loafers, a simple sweater, or a red lip will echo the manicure without requiring an exact outfit match.
7. Classic Tort Shorties:

Classic tortoiseshell works beautifully on short nails because its irregular pattern doesn’t depend on a long canvas. Amber, caramel, and dark brown create the familiar mottled effect, with sheer layers allowing some patches to appear deeper than others.
Mazz Hanna’s original advice was that tortoiseshell is enjoyable to DIY because the pattern is abstract. That’s helpful permission to avoid perfect matching spots. Uneven shapes look more convincing than a grid of identical circles.
Start with a translucent warm base, then add small brown patches in separate layers. Leave amber visible between the darker areas so the result doesn’t become solid chocolate. A glossy top coat enhances the layered appearance. Rounded and squoval shapes both suit this design. If you want a subtle version, keep the darkest markings small and concentrated toward one side of each nail rather than covering the entire surface.
8. Burgundy and Gold Shimmer Nails:

Burgundy topped with fine gold shimmer is an uncomplicated way to make a dark manicure feel dressier. It’s suitable for a dinner reservation, a Thanksgiving gathering, or an ordinary week when you want a little more shine.
Apply enough burgundy polish for an even base, usually in thin coats according to the formula, then add a light layer of gold shimmer. Look for fine particles if you want a softly luminous result rather than obvious glitter.
The main mistake is applying so much gold that the burgundy disappears. Test the topper over your chosen color first, and build gradually. You can also concentrate shimmer near the tips for a gentler gradient. Short oval nails make this combination feel classic, while longer almond nails add drama. If easy removal matters, check whether the topper contains fine shimmer or larger glitter pieces before buying.
9. Cheetah Print Nails:

This version makes the print itself the focus. Warm tan, caramel, and black give the manicure its autumn character, while a little negative space near the base stops the pattern from looking too dense.
Hanna praised that balance in the original article. It’s worth keeping when adapting the design: leave part of the nail bare or sheer, then place the print across the upper section or along one side.
Animal-print labels vary, so take a reference to the salon rather than relying on the name alone. Specify the spot shape, background color, and amount of coverage you prefer. For a home interpretation, place uneven brown marks on a neutral base and add small black accents around selected edges. Avoid outlining every mark identically. The irregular spacing gives the design character, and one printed accent nail can be enough for an otherwise neutral manicure.
10. Dark Brown Chrome Nails:
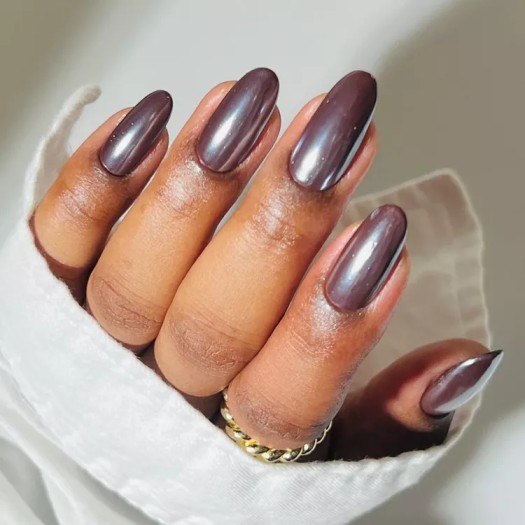
Dark brown chrome combines a chocolate base with a reflective glaze. Depending on the powder or polish used, the finish can appear silvery, pearly, or softly metallic, so the exact product pairing matters.
If you want a glazed chocolate effect, ask for brown to remain clearly visible beneath the sheen. A heavy, opaque silver layer creates a different manicure and can overpower the warmth that makes this look appealing for November.
For an appointment, bring a reference photographed in ordinary light, not only under bright studio lighting. Reflective finishes can look different across settings. A brown polish topped with a sheer pearlescent lacquer offers an accessible home alternative, though it won’t necessarily duplicate powder chrome. Keep coats thin to avoid a bulky finish. This design needs little additional decoration; a clean oval or almond outline lets the contrast between dark color and reflected light stand out.
11. Warm Autumn Tort Shorts:
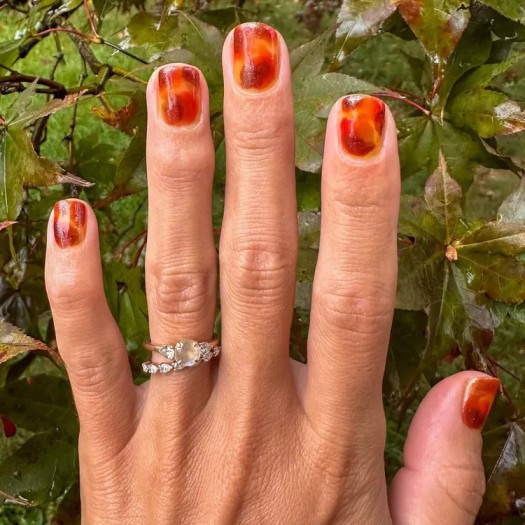
Warm autumn tortoiseshell leans lighter than the classic version. Caramel, honey, and chestnut create a translucent finish that feels especially good beside oatmeal knits and tan suede.
The original article included Olivia Van Iderstine’s advice to build depth through layered strokes. Here, those strokes should stay airy. A sheer amber base with scattered warm-brown patches gives a different result from tortoiseshell dominated by black.
On short nails, use fewer, larger patches rather than many tiny marks. You’ll preserve the jelly-like quality and avoid a muddy appearance. Let each layer settle before applying the next, following your polish’s drying instructions. If your base is opaque, you can still create a warm animal-inspired pattern, but it won’t have the same translucent depth. Ask for a caramel-forward palette at the salon if you want this softer interpretation rather than a very dark tortoiseshell set.
12. Terracotta and Sage Tips:
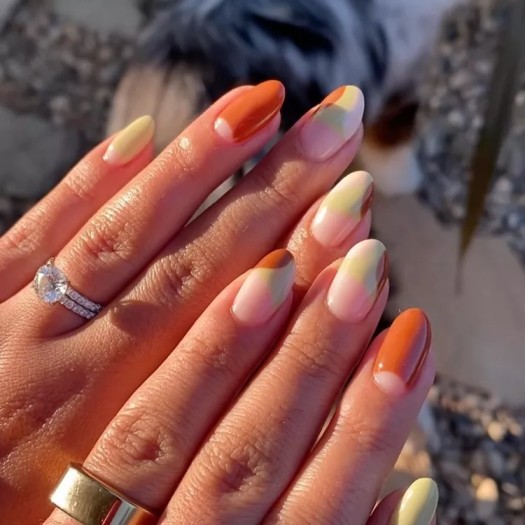
Terracotta and sage offer an earthy alternative to burgundy and chocolate. One is warm and clay-like; the other is muted and green. Together, they capture fall color without relying on glitter or intricate seasonal motifs.
Use a sheer neutral base and alternate the tip colors, or combine both shades in a divided French tip. Hanna highlighted sage’s unexpected contrast in the original article, and that contrast is most effective when neither polish is too bright.
A micro-French version works well on short nails. For longer nails, a slightly deeper curved tip gives the colors room without overwhelming the base. Match the width of the tips across the set, especially if your nails have different lengths. If you’re painting at home, a small cleanup brush can help refine the edges. Wear the combination with cream, olive, rust, or denim rather than trying to match every shade exactly.
13. Abstract Jumbo Jelly Tort Nails:

Oversized tortoiseshell markings change the scale of a familiar design. Instead of many small patches, this manicure uses broad, irregular shapes suspended in a sheer brown or amber base.
That larger pattern is the defining feature, so resist filling every open area. Visible translucent space allows the markings to read as intentional abstract shapes rather than a dark, blended wash.
Orton described this interpretation as a meeting of natural and artistic elements in the original article. For a salon request, specify jumbo patches and a jelly finish, then discuss how much contrast you want. Longer nails provide more room, but short nails can carry one broad patch and a few smaller accents. A home version is possible with translucent polish and restrained layering. Stop before you think every gap needs filling; the open space is part of what separates this look from classic tortoiseshell.
14. Moody Purple Marble:

Berry, plum, and smoky lilac bring marble nails into autumn. A little cream can separate the darker shades, while a sheer base gives the swirls a softer, ink-like appearance.
The original article’s practical method was wet-polish swirling: place small blobs of color on one nail and move them together with a dotting tool. That differs from traditional water marbling, which creates a floating pattern in water. For most beginners, the direct-on-nail approach is the simpler place to start.
Work on one nail at a time while the polish is still workable. Use only a few light passes, since repeated stirring can blend the colors into a single muddy shade. If the formula dries too quickly, try a different compatible polish combination on a practice nail first. Two marble accents with solid plum elsewhere give the effect breathing room and shorten the DIY process.
15. Easy Animal Print:
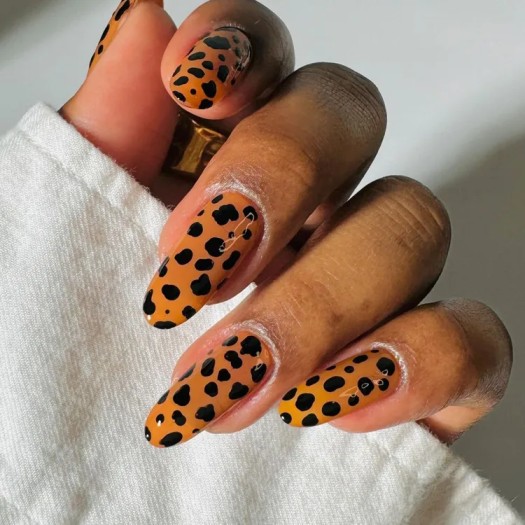
A chestnut base scattered with abstract black dots offers animal-print energy without complicated outlines. It’s a useful starting point if you like the earlier patterned manicures but don’t want to spend an evening painting tiny details.
Keep the dots irregular in both size and placement. A few slightly elongated marks will look more organic than perfectly round spots arranged in straight rows. Leave visible chestnut between them.
A dotting tool makes placement easier, but you don’t need a large kit. Choose a size that suits your nail length and practice the pressure before touching the manicure. The common mistake is crowding the pattern because an empty patch feels unfinished. Step back between dots and assess the whole nail. For an even quicker version, pattern just the ring fingers. A glossy top coat helps unify the base and marks once they’re sufficiently dry.
16. Fall Florals:
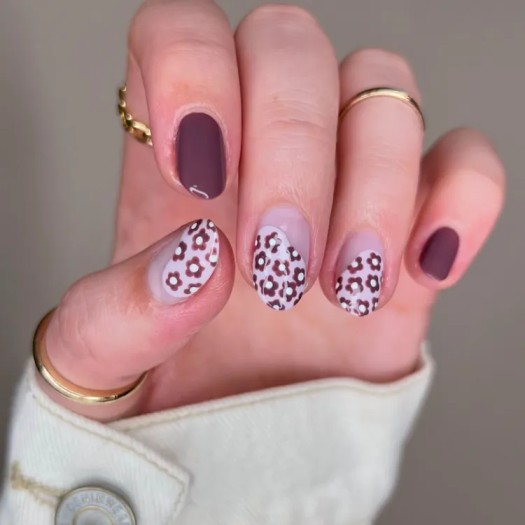
Small flowers in moody colors let you keep floral nail art through November. Swap bright summer combinations for burgundy petals, ochre centers, olive leaves, or muted mauve blooms on a neutral background.
Van Iderstine’s original recommendation emphasized the flowers’ small scale. That’s what helps this design feel delicate rather than summery, especially when you leave some background visible around each bloom.
For DIY flowers, use a dotting tool to place a few petal dots around a center. Don’t squeeze too many flowers onto short nails; one near the tip or a small cluster along an edge can be enough. A sheer blush base creates an understated version, while a chocolate background makes pale petals stand out. If you’re planning several patterned nails, vary the placement rather than reproducing the same bouquet everywhere. The result pairs easily with textured sweaters and simple, solid-colored sleeves.
17. Flavors of Fall:

An espresso-inspired manicure turns coffee colors into soft swirls: deep brown, creamy beige, and a little pumpkin-toned warmth. It’s more abstract than a literal coffee-cup design, making it easy to wear throughout November.
The original article suggested using a silicone stamper to transfer a blend of seasonal shades. If you already own one, experiment on a practice surface first. Use small amounts of compatible polish and check how quickly the mixture transfers before working on your nails.
No stamper? Paint loose cream curves over a brown base, or try a single latte-colored marble accent. Choose a creamy beige that contrasts with your espresso shade so the pattern stays visible. Too much swirling can erase that contrast. Keep the palette to three related colors, and clean the surrounding skin carefully. For a budget-friendly approach, use brown and neutral polishes you already own instead of buying a themed collection.
18. Dark Velvet Tort Tips:

Jet black and amber velvet make a dramatic pairing. The black frames the design, while the amber’s shifting reflective effect brings depth to tortoiseshell-inspired tips.
This is distinct from a flat painted tort pattern. Magnetic polish creates the luminous velvet or cat-eye effect, and its placement depends on the formula and magnet technique. Ask your artist whether the amber shimmer can be concentrated within the tips while the black remains crisp.
A longer almond or tapered shape gives the design space, but shorter nails can wear a narrower amber edge. For home application, use a magnetic polish with clear instructions and the recommended magnet. Work nail by nail rather than finishing the whole hand before shaping the effect. Avoid adding several competing embellishments; the moving light already supplies interest. Black knitwear or warm metallic jewelry will complement the manicure without distracting from its dimensional finish.
19. Matte Navy Maple Leaf Nails:

Matte navy provides a dark background that isn’t black, allowing rust, gold, and burnt-orange leaves to stand out. The contrast creates a distinctly autumnal manicure without needing a leaf on every finger.
Hanna praised the original design’s matte base for giving the leaf colors more impact. Keep that idea by reserving glossy or metallic finishes for the foliage and leaving the surrounding navy softly matte.
For a DIY option, small leaf decals are easier than freehand maple leaves, which have several pointed sections. Check the decal instructions and top-coat compatibility before applying. At a salon, request one or two detailed leaves rather than an all-over motif if you prefer a cleaner look. Short square or squoval nails suit compact foliage placed slightly off-center. Choose an opaque navy that covers evenly; streaks are more distracting when the background is otherwise simple and undecorated.
20. Milk Chocolate Stiletto Tips:

Milk chocolate French tips soften the sharp outline of a stiletto shape. Small silver details add an edgier contrast, making this a dressier alternative to simple brown tips.
The original description paired chocolate with metallic, futuristic accents. You can keep that character without tying it to a past trend year: use a fine silver curve, a small chrome dot, or a restrained geometric mark on selected nails.
True stilettos are sharply pointed. If that shape doesn’t suit your routine, ask for a tapered almond version with the same colors and detailing. Make sure the brown tip leaves enough neutral base visible, particularly on shorter lengths. Silver should support the design rather than obscure it. Raised charms are optional, not essential; flat painted accents are less likely to catch on clothing. A silver ring and a simple chocolate or cream sleeve complete the look without extra pattern.
21. Mulberry Plaid:
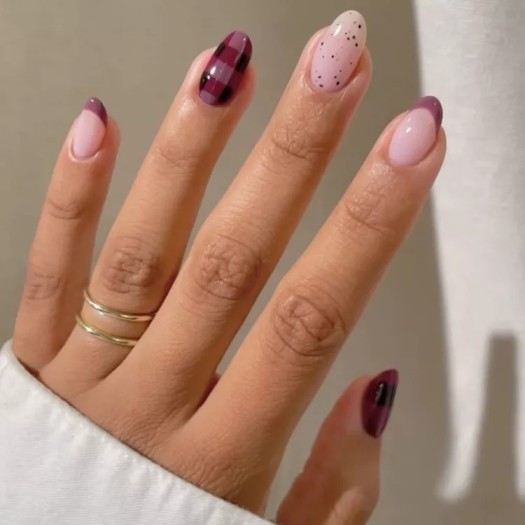
Mulberry plaid brings the mood of a flannel shirt into your manicure without copying a literal fabric swatch. A wine-colored base with thin cream, muted pink, or brown lines keeps the palette autumnal and cohesive.
Both Van Iderstine and Haye recommended plaid in the original article. Their useful starting point was layering alternating stripes. Begin with the wider, softer lines, let them dry, then add narrower contrasting strokes.
The challenge is proportion. Thick lines can swallow a short nail, so use a fine striping brush and leave space between intersections. Practice the order of the colors before painting your full set. If detailed plaid feels ambitious, try it on two accent nails and use mulberry French tips elsewhere. This also keeps the manicure from competing with patterned clothing. Choose two or three supporting colors at most, especially when the base is already deep and saturated.
22. Neutral Mauve Foliage Nails:

A sheer mauve manicure can acknowledge fall without abandoning your usual neutral style. Fine leaf outlines and small gold accents add seasonal detail while leaving most of the nail softly translucent.
Orton’s original recommendation emphasized the understated combination of subtle color, foliage, and gold. Preserve that restraint by choosing one small branch or leaf cluster rather than covering every nail with decoration.
Look for a mauve base that gives the level of coverage you enjoy. A sheer wash feels different from an opaque dusty-purple polish, even if the bottle colors look similar. For DIY application, a leaf decal and a tiny metallic accent are enough. Place the detail where it won’t overwhelm the nail, such as along one side. This design suits everyday wear and dressier occasions, particularly if you want your manicure to complement rings rather than compete with them.
23. Plum Velvet Nails:
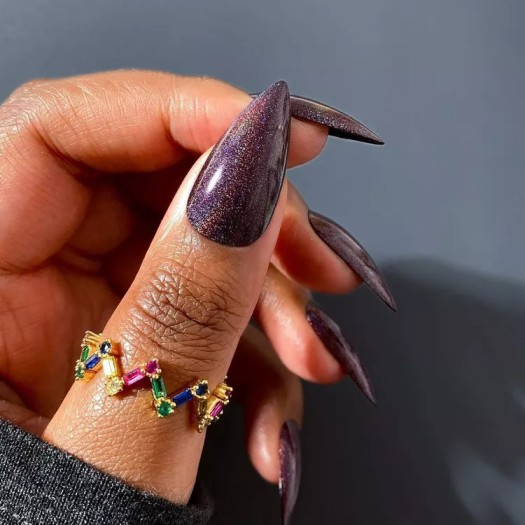
Plum velvet nails rely on finish rather than painted motifs. The deep purple color gains a luminous, shifting quality from magnetic particles, creating a manicure that looks richly dimensional without additional decoration.
Ask for a diffused velvet effect if you prefer a soft glow across the nail. A more concentrated cat-eye band produces a sharper stripe of reflected light. Both work with plum, but they aren’t identical results.
For home use, buy a magnetic formula with clear application instructions rather than assuming any shimmer polish will respond to a magnet. Follow its timing and curing requirements, and avoid mixing incompatible systems. A regular plum shimmer is a simpler alternative if you don’t want extra equipment. Rounded, oval, and almond shapes all suit this design. Check the finished color in daylight as well as indoor light, since a very deep plum may read almost black in dim settings.
24. Snoopy Thanksgiving Nails:
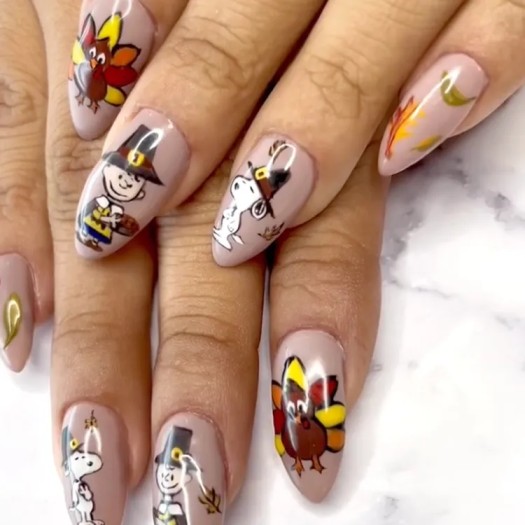
A Snoopy manicure brings a nostalgic, playful touch to Thanksgiving nails. The original article featured a design by nail artist Laura Malarkey, using the familiar character as the centerpiece of a seasonal set.
Rather than relying on an unverified claim about parade appearances, let the character and autumn palette tell the story. Cream, warm brown, pumpkin orange, and small leaf details provide plenty of November context.
Detailed character art is usually best handled by an experienced nail artist. Ask to see examples of their illustrative work and allow enough appointment time. If you prefer an at-home version, use an appropriately sized nail decal and keep the other nails simple. One character accent often looks cleaner than several crowded scenes. A smooth, flat design is also practical if you’ll be preparing food or wearing gloves. Choose short or medium lengths if comfort matters more than a large illustration.
25. Sunflower Nails:

Sunflowers can work beautifully in an autumn manicure when their colors are softened. Mustard-yellow petals, chocolate centers, and olive leaves feel more November-ready than bright lemon yellow against a vivid summer background.
Orton’s original advice was to use deeper, warmer tones. Apply that approach to both the flowers and the base: cream creates a gentle contrast, while chestnut or muted terracotta gives the design a richer setting.
A partial sunflower near the tip is useful on short nails because it doesn’t require room for the entire bloom. For a simpler DIY version, paint petal-like strokes around a dark center on one accent nail. Avoid making every petal identical; slight variation keeps the flower from looking rigid. Finish the remaining nails in one supporting shade. If you’re undecided among November nail looks, this is a cheerful option that still belongs comfortably beside cozy clothes and earthy fall colors.