


I was five minutes from leaving for dinner when I looked down at my hands and realized my manicure was completely wrong for the outfit. The black polish felt too heavy with my butter-yellow dress, but bare nails looked unfinished. I grabbed a dotting tool, added a few tiny brown spots over a milky base, and suddenly the whole look made sense. That little rescue job is why I keep coming back to polka dot nails. They can be sweet, graphic, retro, polished, or a little silly in the best way. You can wear them with jeans and sneakers or with a satin dress and pointed-toe heels.
Polka dot manicures are having a particularly fun moment because they fit several looks at once. The current mood leans toward sheer jelly finishes, soft neutrals, butter yellow, cherry red, ballet details, chrome accents, and playful mismatched nails. You don’t need a complicated salon design to join in. Sometimes one accent nail and a $5 dotting tool are enough. Other designs need a steady hand, but most can be adjusted for short nails, press-ons, or a simple at-home manicure. Here are 23 polka dot nail ideas to save before your next nail appointment.
1. Structured Neutral:

This is the manicure I recommend when you want something interesting but still need your nails to work with everything in your closet. Start with a nude almond or softly rounded base that matches your undertone. Add creamy white or caramel dots in neat rows. The trick is keeping the dots consistent. Large, uneven spots can make the design look accidental, while tiny dots can feel more refined. I like a medium dot placed slightly off-center rather than a perfectly rigid grid.
Wear this with a chocolate-brown knit dress, tan loafers, and a structured leather bag. It also looks lovely with a white button-down, straight-leg jeans, and gold hoops. If you have shorter nails, use smaller dots and leave a little breathing room around the edges. That keeps the manicure from looking crowded.
2. Jelly Rainbow:
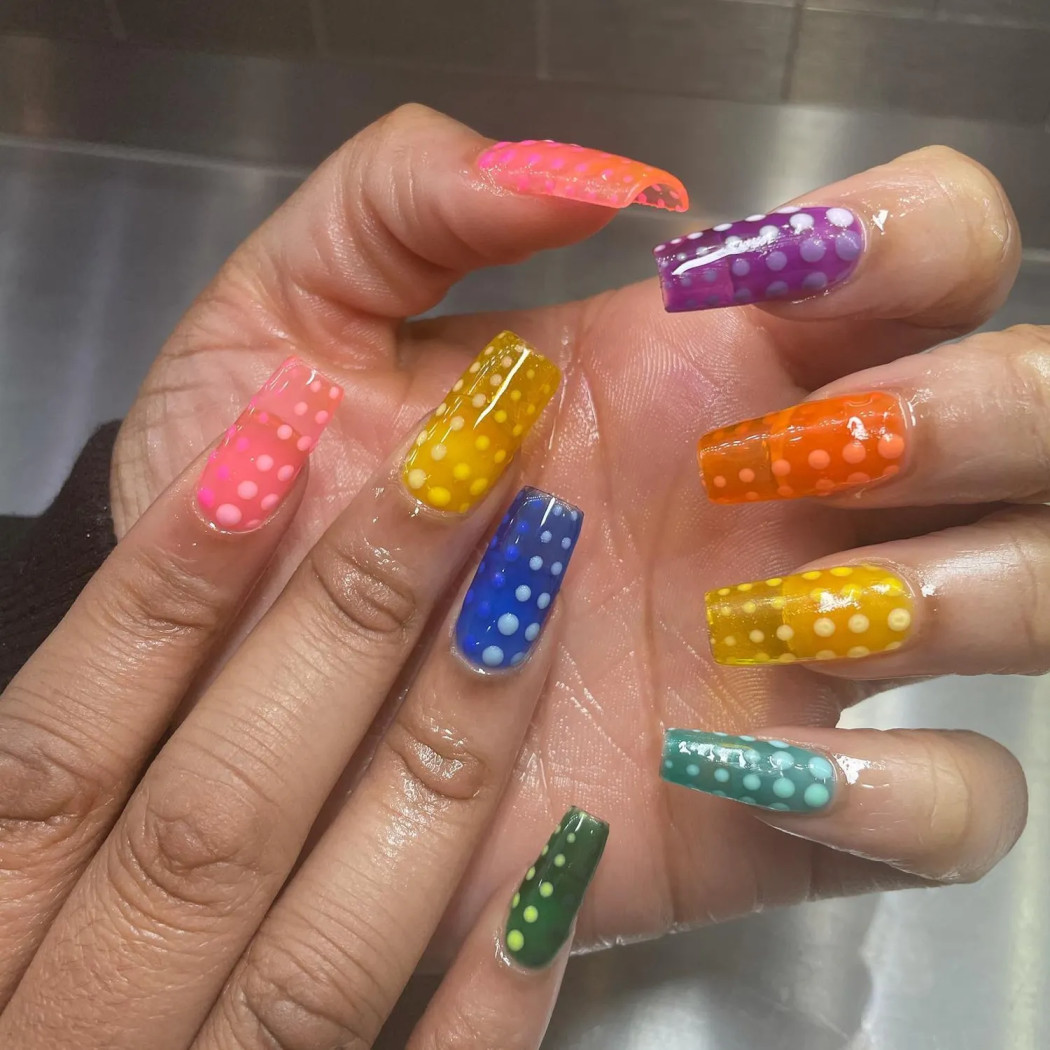
Jelly nails are still one of the easiest ways to make a colorful manicure look light instead of overwhelming. For this version, use a different translucent shade on each nail: pink, orange, yellow, green, blue, and purple. White dots keep the rainbow from becoming too busy. I would place them in a simple vertical trail rather than covering the entire nail. Add a glossy top coat so the colors look almost candy-like.
This design is perfect for vacation, festivals, birthdays, or those weeks when your wardrobe feels too neutral. Try it with a white linen shirt, relaxed denim shorts, and colorful ballet flats. For a less expensive version, sheer polish from brands like Sally Hansen or Essie can work well over a clear or milky base. Press-on nails are also useful here because rainbow placement is easier when every nail already has a smooth shape.
3. Accent Nail:

You do not need polka dots on every finger. In fact, one accent nail can look more intentional when the rest of the manicure is simple. Try a muted emerald green and solid white combination. Paint most nails in one color, then use a white base with green dots on both ring fingers. You could also reverse it with green nails and one white accent nail.
I like this design for the office because it has personality without taking over your hands. It would look especially good with a cream blazer, olive trousers, and brown loafers. This is also a practical option if you are doing your own manicure. If one nail turns out better than the rest, make it the feature instead of trying to make every finger identical. For a softer version, swap emerald for sage. For fall, try forest green with ivory dots.
4. Get Trippy:

This is for anyone who looks at a plain manicure and thinks, “It needs one more thing.” Start with a blue gradient base, moving from pale sky blue to cobalt or indigo. Then add dots in pink, yellow, orange, and green.
The dots should vary in size, but keep the color palette coordinated. Too many shades with no repeated color can make the set look messy. Repeating two colors across several nails gives the design rhythm.
I would wear this with a simple outfit: a white baby tee, wide-leg denim, and red sneakers. Let the nails provide the visual interest.
If you have a petite nail bed, keep the gradient pale and use smaller dots. Longer almond or oval nails can handle larger spots and more color. A salon artist can create this with an airbrush effect, but a makeup sponge can also create a gentle gradient at home.
5. ’60s Chic:
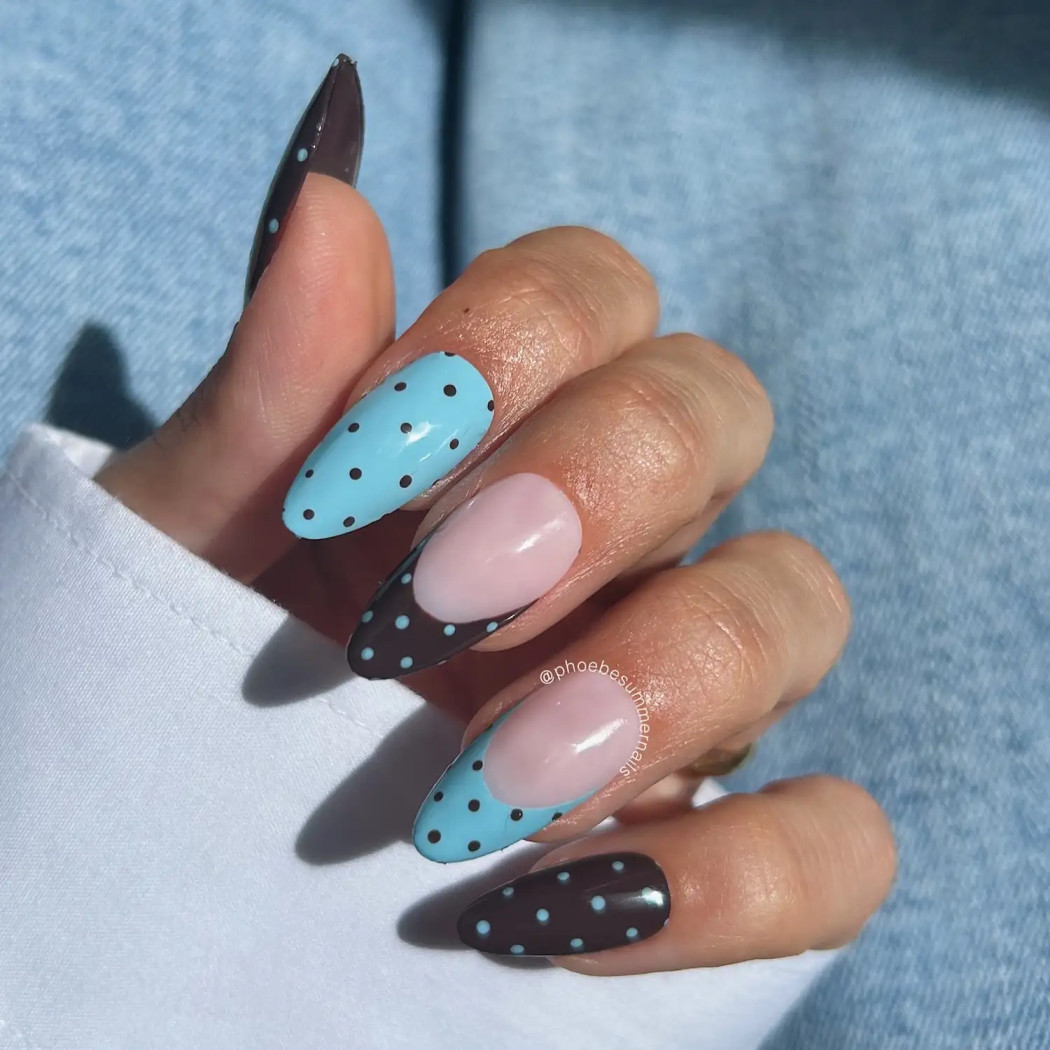
Robin’s egg blue and espresso brown have that wonderful vintage feeling without looking like a costume. Use the blue as the main base and add small brown dots, or reverse the combination on alternating nails.A rounded, medium-length shape suits this design best. It echoes the neat, polished silhouettes associated with mid-century fashion. I especially like it with a cropped cardigan, high-waisted cigarette trousers, and low block heels.I used to think retro nail designs needed a full vintage outfit to make sense. I was wrong. These colors work with modern clothes because the shapes stay clean.
Try a blue-and-brown set with a white T-shirt, dark denim, and a burgundy shoulder bag. The manicure will feel considered without looking overly themed.For a budget version, look for individual polish shades rather than buying a whole collection. You only need one soft blue and one rich brown.
6. Bubbly French:

A French manicure becomes much more playful when the tips are decorated with tiny dots. Use baby blue and butter yellow dots over a sheer pink or clear base.You can add the dots along the French line, or create a full curved tip made from alternating spots. A long square shape gives the design a dramatic, early-2000s feel. A short squoval shape makes it easier to wear every day.
This manicure would be adorable with a butter-yellow cardigan, white jeans, and a pale blue handbag. It also works with a simple black dress when you want a cheerful detail against a darker outfit.I would ask your nail artist to keep the French line thin if your nails are short. A thick tip can visually shorten the nail even more. On longer nails, the dots can be slightly larger so they remain visible from a distance.
7. Retro Rainbow:

This is one of the most eye-catching designs in the group. Each nail gets a different French tip, followed by two or more colors of dots. Think peach over pink, blue over lavender, or yellow over orange. The key is choosing colors with similar brightness. Pastel dots on bright neon tips can work, but they need a unifying glossy finish. Otherwise, the set may look disconnected.
I would wear this manicure with a denim jacket, a white slip dress, and colorful sneakers. It also looks great with a plain navy jumpsuit because the nails become the cheerful accessory. If a full set feels like too much, use the rainbow French idea on only two nails and keep the others sheer. This is a good compromise for anyone who enjoys color but gets tired of bold nails quickly.
8. French Feast:
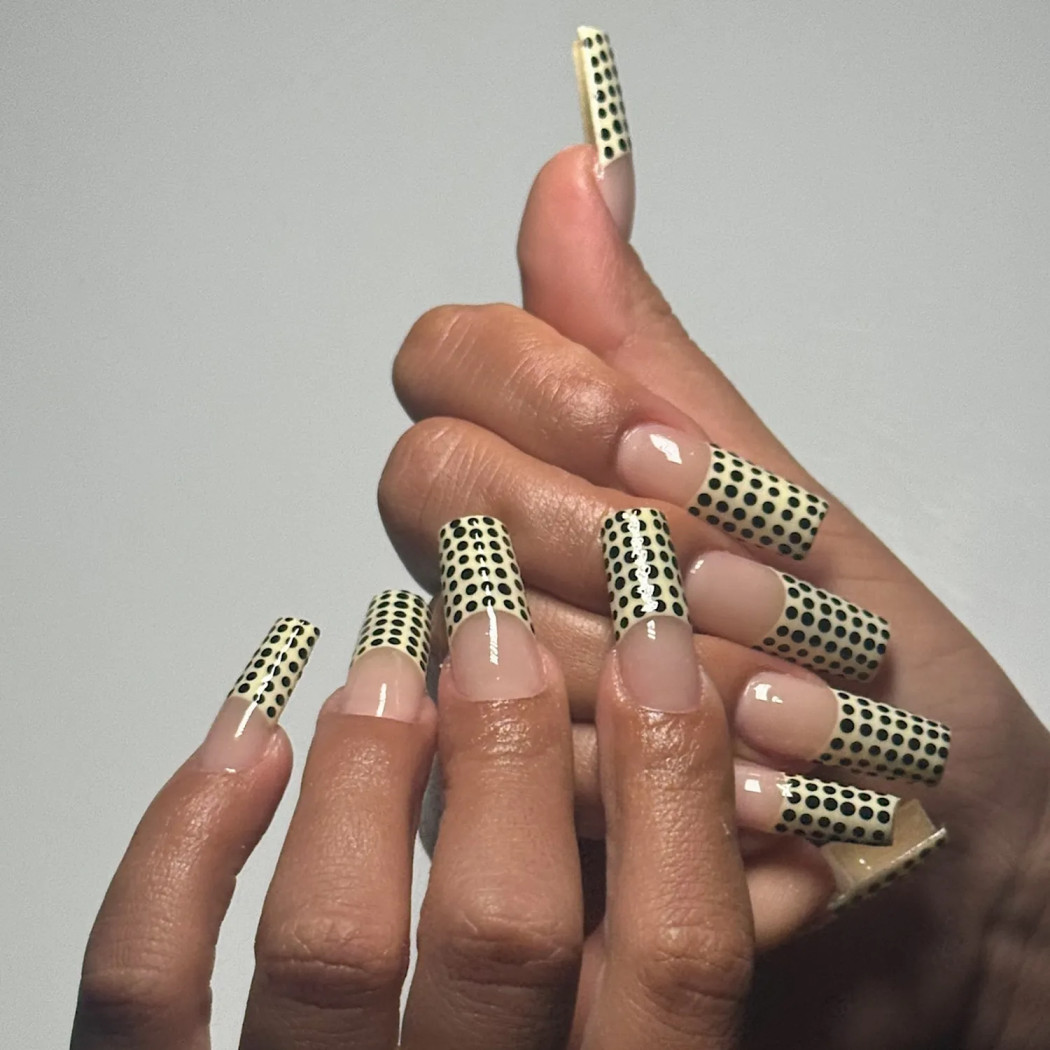
Butter yellow has become a favorite because it feels softer than bright lemon but still gives the hand plenty of color. For this design, use a butter-yellow French tip and add crisp black dots over the yellow. The contrast makes the dots look almost printed. That precision is what gives the manicure its polished appearance.
This set pairs beautifully with black trousers, a white sleeveless top, and a yellow mini bag. You can also wear it with a chocolate-brown dress for a warmer fall combination.
If you are doing this at home, wait until the yellow tip is completely dry before adding the black dots. I once rushed this step and dragged the base color into the dots. The fix was not difficult, but removing one nail and starting again took longer than simply waiting. A glossy top coat is essential here. It makes the yellow look smoother and helps the black details stand out.
9. Dainty Dots:

For a more unusual color combination, try popcorn yellow with milky chocolate brown. Paint each nail a different shade, then add tiny dots in the opposite color. This inverted approach makes the manicure feel more graphic. The yellow looks softer against brown, while the brown feels less serious against yellow. I would style it with a cream knit vest, dark-brown trousers, and a woven handbag. It would also work with a denim midi skirt and a tucked-in white blouse.
The dots should be small and close together, especially on short nails. If you make them too large, the contrast can become harsh. A dotting tool with a small end or the rounded tip of a bobby pin can work for this design. This is one of my favorite options for early fall because it feels cozy without relying on the usual burgundy polish.
10. The Cherry On Top:

A soft pink base with olive-green dots and tiny cherry details is sweet without looking overly childish. Use a pale pink or princess-cake shade as the foundation. Add a few green dots, then place tiny cherry shapes on one or two nails. The cherries do not need to be perfect. Two red dots with a little green stem are enough.
This set feels made for late summer, but it transitions well into early fall with the right clothes. Try it with a cream sundress, a cropped denim jacket, and red Mary Jane shoes. For a more grown-up version, use dusty rose, deep olive, and wine-red cherries. A short rounded nail shape keeps the design practical for typing and everyday errands. If you prefer a simpler manicure, skip the cherry drawings and use pink and olive polka dots on French tips instead.
11. Classic Polka Dot:

A classic brown-and-white polka dot nail can sit comfortably inside a maximalist manicure. Use a dark espresso base on a few nails and white dots on top. Keep the remaining nails different but related, perhaps with a bow, aura effect, frame detail, or a glossy neutral. The secret is repeating at least one color across the full set. White dots, brown accents, or a shared glossy finish can make very different designs look intentional.
I would pair this with a chocolate blazer, a cream camisole, straight-leg jeans, and pointed black flats. The nails already have plenty of detail, so the outfit can stay simple. If you prefer minimalism, paint all ten nails espresso brown and add small white dots only to the index and ring fingers. It gives you the same retro feeling with much less maintenance.
12. Lava Lamp:

Layered neon dots create a lava-lamp effect that feels playful and slightly nostalgic. Start with black French tips or a sheer black base. Then add overlapping circles in pink, orange, electric blue, and lime. Do not worry about making every dot perfectly round. The charm comes from the layered, floating appearance.
This look is especially fun for a concert, holiday party, or weekend trip. Wear it with a black tank, silver trousers, and chunky sneakers. The nails will echo the energy of the outfit without needing additional accessories. For a wearable version, use only two neon colors over a black tip. Neon pink and orange look warm and retro, while cobalt and lime feel sharper. Short nails can handle this design if the dots are concentrated near the French line. On longer nails, you can let the pattern travel upward.
13. Cherry Wine:
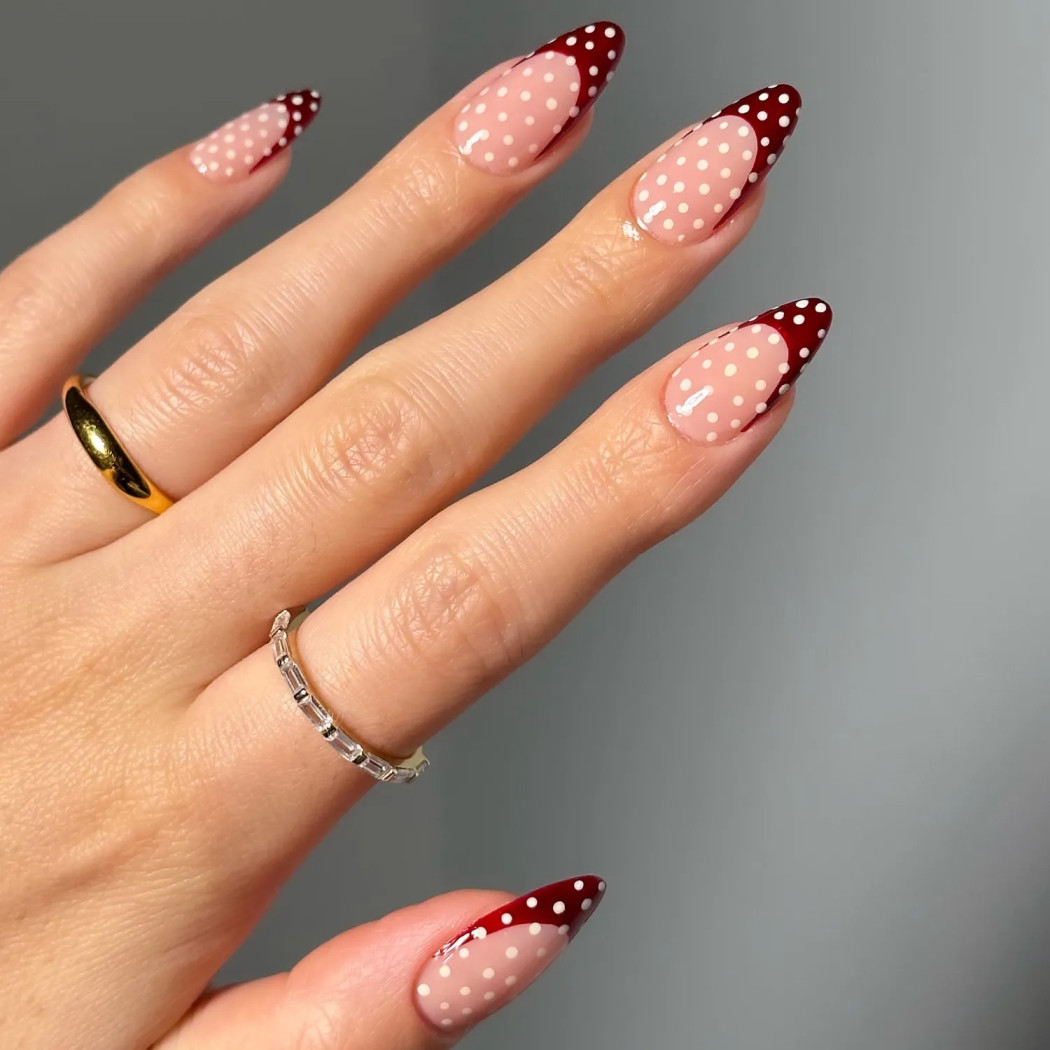
Deep red or cherry-wine French tips are a reliable choice when you want something elegant. Add sharp white dots over the red tips for a fresh twist. This is one of the easiest polka dot nail designs to wear in fall and winter. It works with office clothes, date-night outfits, and wedding guest dresses. Try it with a black wrap dress, sheer tights, and pointed slingback shoes. The red should be rich rather than bright if you want a more polished finish. Oxblood, merlot, and dark cherry shades are all good directions.
I would choose a medium oval or almond shape for this manicure. It softens the dark color and keeps the hands looking graceful. If you prefer short nails, use a narrow red tip and tiny white dots so the design does not feel crowded. A glossy top coat makes the red look almost like lacquer.
14. Double Denim:
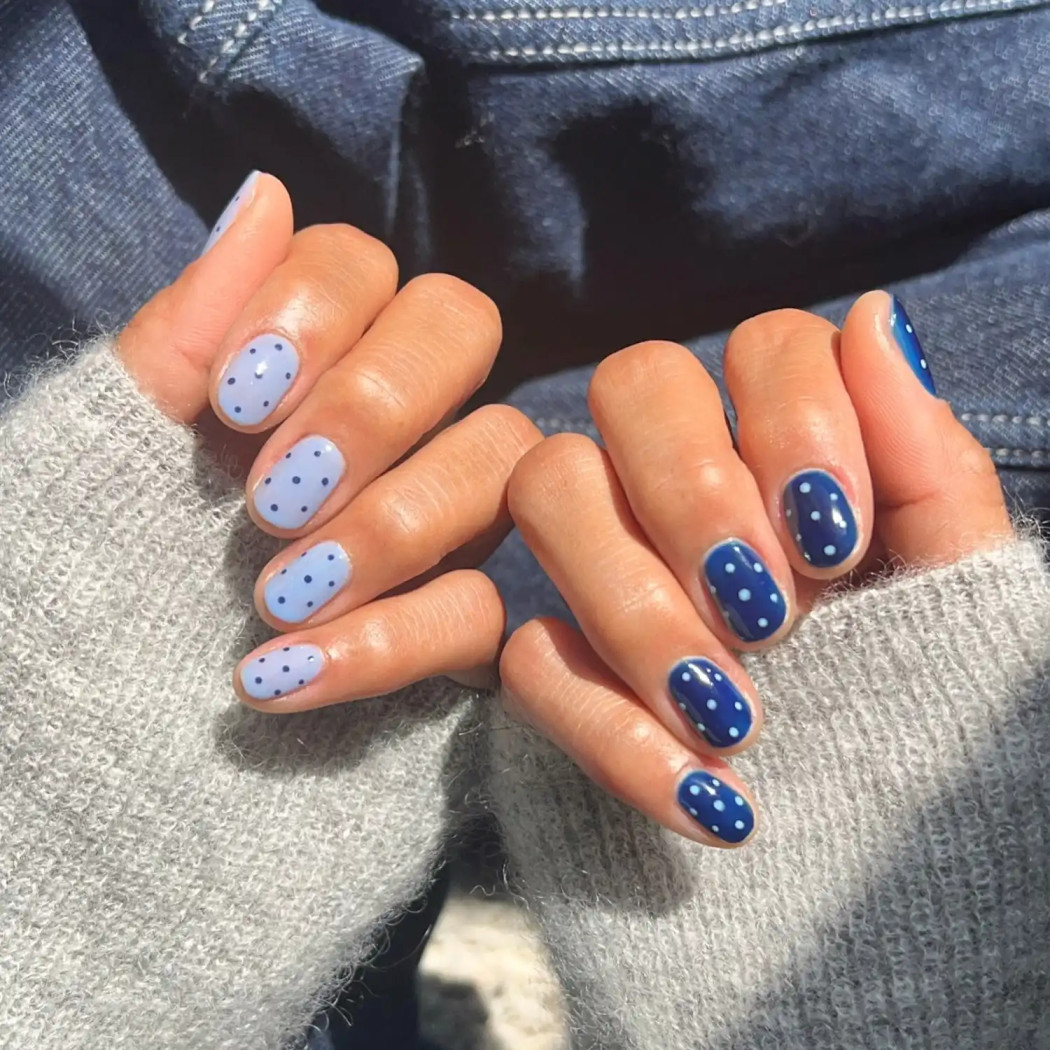
Blue-on-blue polka dots are the manicure version of your favorite jeans. Use bright navy and baby blue together, then reverse the colors on different nails. For example, paint three nails baby blue with navy dots, two nails navy with baby-blue dots, and repeat the pattern on the other hand. The inverted pairing keeps the set cohesive without making it repetitive.
This looks fantastic with a cropped denim jacket, a white ribbed tank, and wide-leg jeans. If you are mixing denim shades in your outfit, keep the shoes simple with white sneakers or tan sandals. I used to think matching denim nails to a denim outfit would be too coordinated. It can be, but only if every shade is identical. Using contrasting blues makes it feel deliberate rather than matchy-matchy.A matte top coat would make this design feel more modern, while gloss keeps the retro effect stronger.
15. Deep Blue Sea:
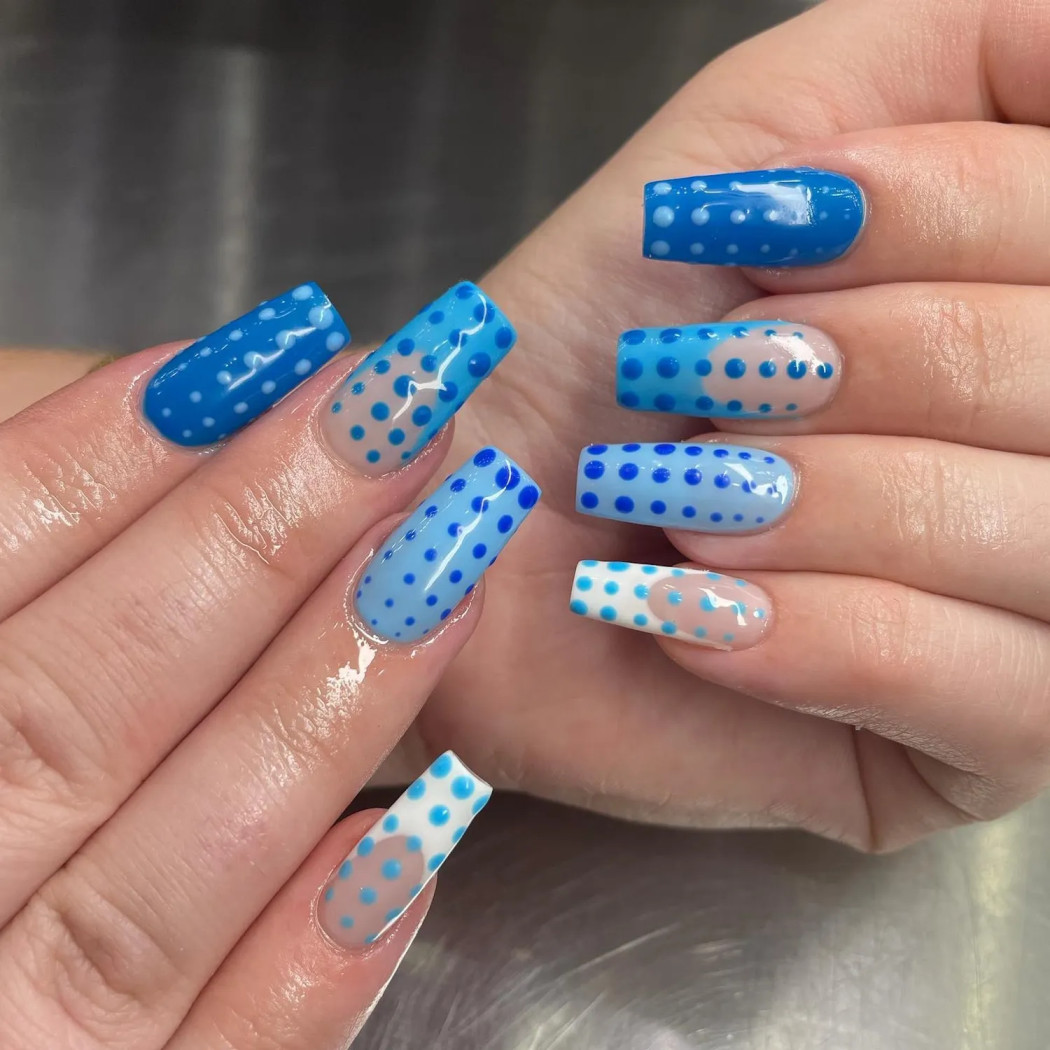
For a more artistic blue manicure, alternate full-color nails with French designs. Use a mix of white, pale blue, medium blue, and navy. Add dots in different sizes so the set looks like bubbles or a graphic underwater print. This design suits longer oval or almond nails because the gradient has room to move. However, a simplified version works on short nails too. Use one blue base and add three dots near the tip.
Wear it with a white linen shirt, cobalt trousers, and metallic sandals. Or style it with a gray sweater and dark jeans when the weather turns cooler. The most flattering version uses at least one pale shade near the cuticle. Too much dark blue across the entire hand can feel heavy, especially on shorter nails. If you love blue but want something less bold, replace navy with denim blue and keep the dots creamy white.
16. Balletcore:

Ballet-inspired nails are still charming when you keep the details light. Use a sheer pink, soft blush, or milky nude base. Add tiny white polka dots to one accent nail, then decorate the others with delicate bows or small pearl-like charms. The manicure looks best when the details are tiny. Large bows can become uncomfortable, especially if you type, cook, or wear gloves often.
Pair this set with a pale pink cardigan, a gray wrap skirt, and satin ballet flats. For a more everyday outfit, try a white T-shirt, straight-leg jeans, and a blush shoulder bag. If charms are not practical for you, paint small bows instead. You will get the same ballet-inspired mood without worrying about pieces catching on sweaters. A short rounded shape makes this manicure feel soft and wearable. Longer almond nails give it a more dramatic, romantic finish.
17. Glittery Black Jelly:
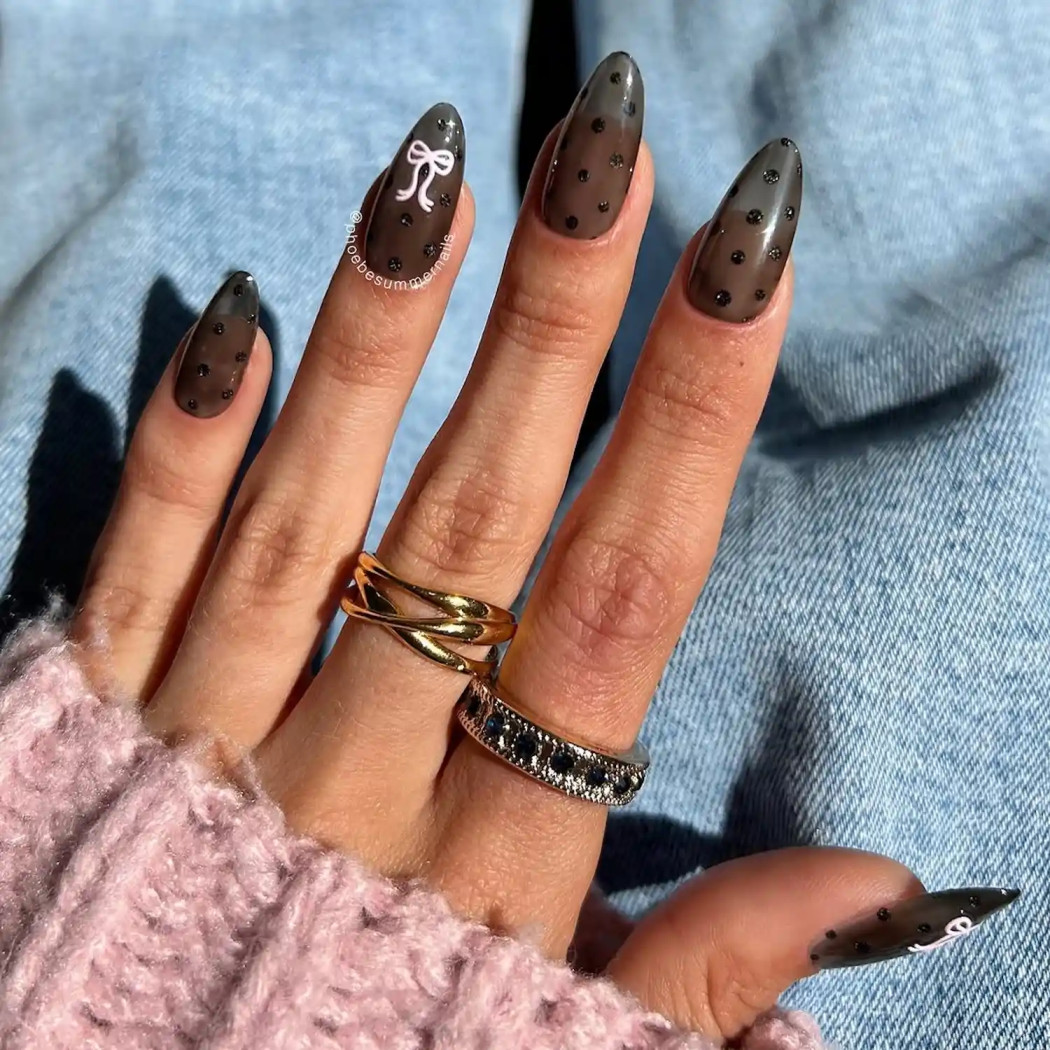
Black jelly polish can look surprisingly delicate because the sheer finish lets a little natural nail show through. Add glitter dots in silver, champagne, or pale pink. One pastel bow on an accent nail keeps the set from feeling too severe. This is a beautiful option for evening plans, especially when you want something darker than a traditional neutral. Wear it with a black satin slip dress, a cropped leather jacket, and silver earrings.
If a full black set feels too bold, use the jelly black on the tips only. You can also add glitter dots over a sheer nude base for a softer version. Glitter placement matters. A few reflective dots look intentional; covering every nail in random glitter may make the set lose its clean shape. For a salon appointment, ask for a translucent black rather than opaque black. That sheer depth is what makes the manicure feel modern.
18. Abstract French:

Abstract French nails and polka dots work beautifully together because both designs leave space around the natural nail. Choose two or three bold colors, such as orange, cobalt, pink, and green, then create uneven French sections. Add contrasting dots to one or two nails. The dots should echo one of the French colors so they look connected to the rest of the set.
This is a good manicure for a plain outfit. I would wear it with a black jumpsuit, white sneakers, and a bright shoulder bag. The nails become the colorful detail without competing with a printed dress.
If your nail beds are small, keep the abstract French shapes narrow and use only one dot accent per nail. On longer nails, sweeping curves and larger spots will have more impact. Do not aim for identical lines. The slightly different shapes are part of the design.
19. Nudes and Neutrals:
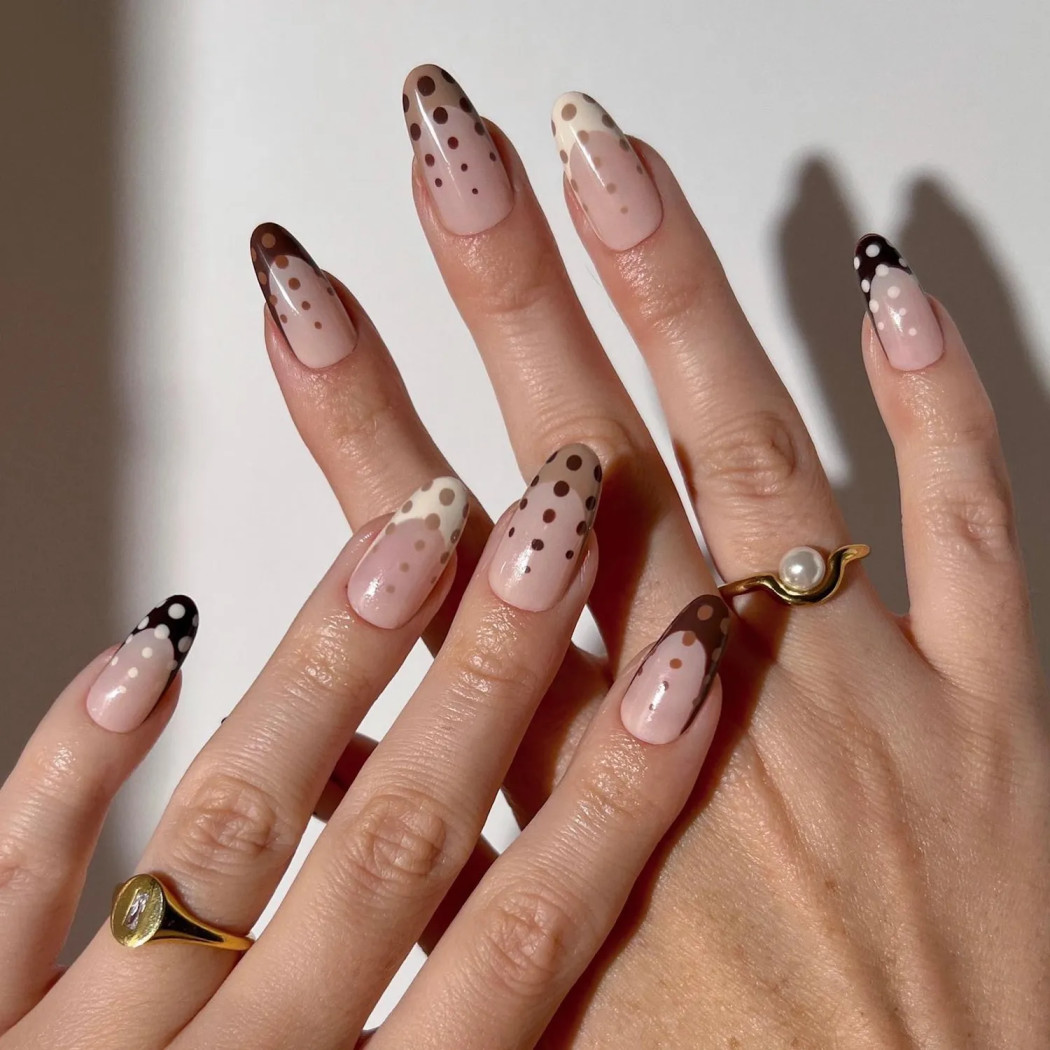
Warm beige, creamy white, black, and soft pink create a cozy neutral manicure that works throughout the year. Use a different neutral on each nail or keep most of the set beige with black-and-white dot accents on the pinkies.
This style looks hand-painted and expensive even when the colors are simple. The finish matters more than the number of details, so smooth the surface and seal it with a high-shine top coat. I would style it with a camel coat, black trousers, a pale pink knit, and loafers. In summer, switch to a white cotton dress and tan sandals.
For deeper skin tones, try caramel, cocoa, terracotta, and cream instead of pale beige. For fairer skin, pink-beige and soft taupe can provide contrast without looking harsh. The best neutral is the one that gives your hand definition. If a nude makes your nails disappear, choose a shade one or two tones deeper.
20. Primary Polka Dots:
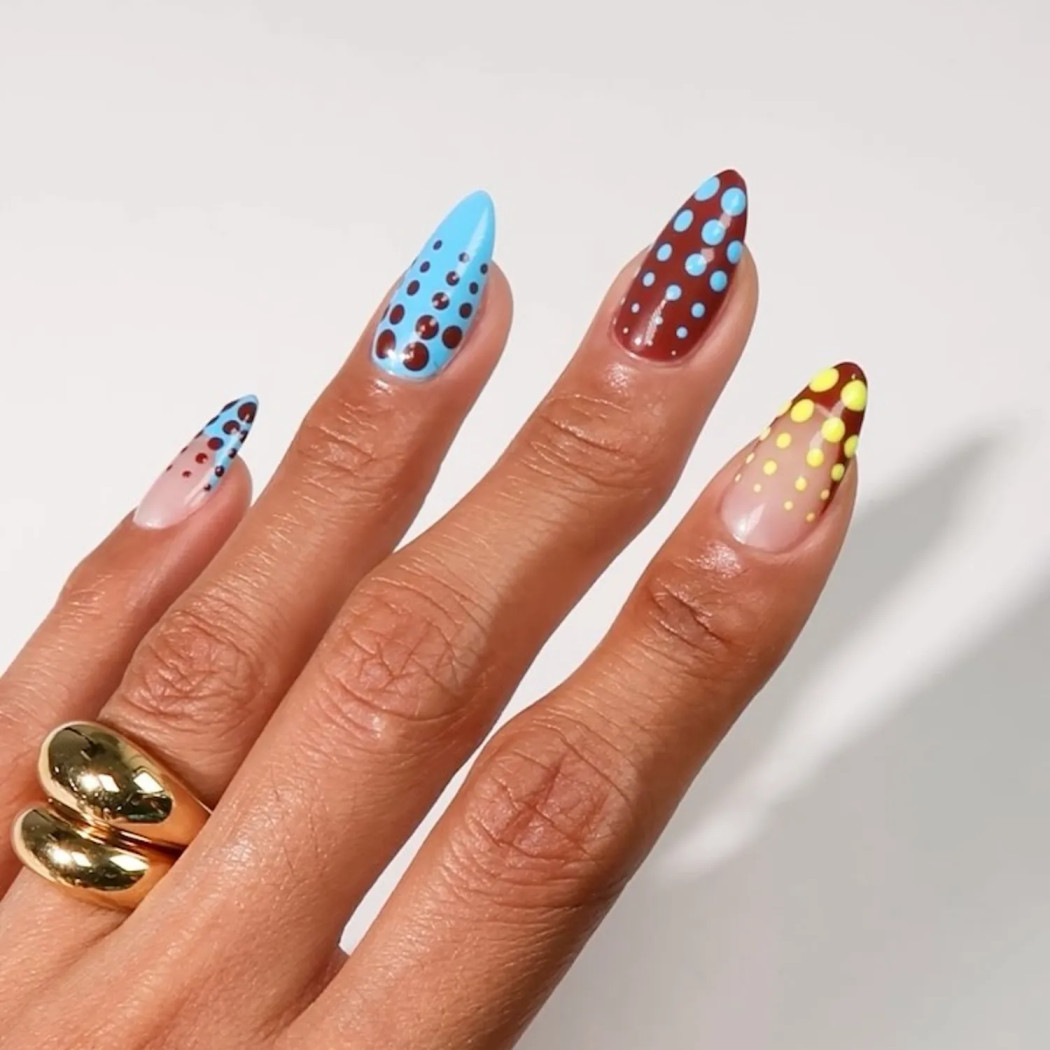
Sky blue, oxblood red, and lemon yellow create a playful primary-inspired combination with a slightly vintage feel. Use one color as the base on each nail, then add dots that begin near the cuticle or travel down from the tip. Varying the dot size keeps the set from looking like wallpaper. Try larger dots near the base and smaller dots toward the tip, or reverse the pattern for a more graphic effect.
This manicure would be fun with a navy cardigan, red ballet flats, and a yellow hair ribbon. You can also wear it with denim and a plain white tee. If three colors feel like too much, choose blue and red only. The combination still has that retro energy but is easier to coordinate with your wardrobe. Short nails look especially cute with this design because the dots can act like tiny color blocks.
21. Chrome Dreams:

Chrome does not have to cover every nail. A simple silver chrome dot on one accent nail can make a neutral manicure feel current without becoming difficult to wear. Start with a sheer nude or soft gray base. Add abstract white or black lines on a few nails, then use silver chrome powder for raised dots or small metallic circles.
This design looks polished with a gray blazer, black trousers, and silver jewelry. It also works with a satin evening dress because the chrome catches the light without adding another color.
If you are booking a salon appointment, ask whether the artist can seal the chrome detail properly. Raised designs can lose their shine if they are not finished carefully. For an at-home version, use metallic silver polish instead of chrome powder. It will not have the same mirror effect, but it still gives the manicure a reflective accent.
22. Pattern Party:

A pattern-party manicure is ideal if you can never choose between dots, color, French tips, and abstract shapes. Give each nail a different design, but repeat two or three colors throughout the set. A fuchsia nail with white dots can be the statement finger. On the thumb and pinky, try a blended base with tiny white dots. Keep the middle fingers simpler so the manicure has somewhere to rest visually.
This design looks especially good with a monochrome outfit. Wear a black top, black jeans, and bright shoes that pick up one of the nail colors. I would not combine this manicure with a large floral dress unless you enjoy maximalism. With a busy outfit, choose fewer nail colors and repeat one pattern more often. If you want to try it yourself, paint one hand at a time and let each layer dry fully. Pattern-heavy nails become difficult to correct once several wet colors overlap.
23. Inverted Elegance:

Inverted polka dots have a clean, modern feeling. Paint one hand with a deep brown base and pale dots, then reverse the colors on the other hand. You can also alternate the base and dot colors nail by nail. A rounded medium-length shape keeps the look timeless. Add a subtle shimmer to the dots if you want the manicure to catch the light beside rings or a delicate bracelet.
This is a strong choice for weddings, dinners, or any event where you want detail without bright color. Pair it with a navy midi dress, nude heels, and gold jewelry.
The contrast should be clear but not extreme. Chocolate and cream feel softer than black and white, while burgundy and blush create a romantic version. If you like short nails, keep the dots tiny and use a sheer base around the edges. The open space makes the manicure look neat and lengthens the appearance of the nail.
How to style this yourself?
You do not need a professional kit to make a polka dot manicure work at home. Start with clean, shaped nails and push back your cuticles gently. A smooth base makes every dot look better.
Follow these simple steps:
- Apply a base coat and let it dry.
- Add one or two thin coats of your main color.
- Choose a dotting tool, bobby pin, toothpick, or the rounded end of a small makeup brush.
- Place a small amount of polish on foil or a plastic palette.
- Dip the tool lightly and press it straight onto the nail.
- Refresh the polish after every few dots so the size stays consistent.
- Let the design dry before applying a thick glossy top coat.
For more control, make the dots smaller than you think you need. You can always add another layer to make them bigger, but you cannot easily shrink a dot once it is on the nail.
When you are unsure about color, use one neutral base, one dark shade, and one soft accent. Cream, espresso, and butter yellow are a dependable combination. So are sheer pink, cherry red, and white.
What to wear with polka dot nails?
Polka dot nails are easiest to style when one color appears somewhere in your outfit. It does not need to match exactly. A navy dot can connect with denim, while a cherry-red dot can echo lipstick or a handbag.
- For work, choose nude nails with brown dots, emerald accents, or a thin dotted French. These designs look polished with a blazer, tailored trousers, and loafers.
- For weekends, try jelly rainbow, lava lamp, or pattern-party nails. Keep the outfit simple with jeans, a white tee, and sneakers.
- For weddings, balletcore, cherry wine, inverted elegance, or chrome dreams are lovely choices. They bring detail without competing with a printed dress.
- For fall, reach for espresso, olive, oxblood, cream, and mustard. For spring and summer, try butter yellow, baby blue, pastel pink, and translucent rainbow shades.
Common mistakes to avoid:
The first mistake is using too many unrelated colors. A polka dot manicure can be colorful, but repeating two or three shades will make it feel much more deliberate.
The second is making every dot the same size when the design is meant to look playful. A little variation creates movement. If you want a neat, elegant manicure, keep the dots consistent. If you want an artsy set, vary them on purpose.
I used to think a thick top coat could fix any nail design. It cannot. If the base is lumpy or the dots are still wet, the top coat may drag the colors together. Waiting a few minutes makes a noticeable difference.
Another common mistake is ignoring the nail shape. Long square nails can carry large dots and dramatic French tips. Short rounded nails usually look better with smaller dots and more open space.
Finally, do not choose a design only because it looks good in a close-up photo. Think about your daily routine. If you type constantly or wear gloves at work, raised bows and charms may annoy you. A painted version will give you the same mood with less fuss.
Polka dots are forgiving, which is part of their charm. You can keep them tiny and quiet, make them colorful and loud, or place one perfect accent on an otherwise simple manicure. My favorite starting point is a sheer nude base with espresso dots, especially when I have no idea what I’m wearing yet.
Pick one color from your wardrobe, add one unexpected shade, and try the dot pattern on just two nails first. That small experiment may be all your outfit needs.