

Last November I sat in my usual nail chair, scrolling through my camera roll trying to find something that wasn’t just “gel, red, done.” My nail tech, Priya, looked at me and said the phrase that changed my whole winter: “Have you tried sweater nails?” I thought she meant gluing tiny sweaters onto my fingers. She did not. She meant that cozy, knitted-texture look that makes your nails look like they’re wearing a chunky cable-knit pullover.
That appointment turned into a two hour session, three ruined attempts at home over the following weeks, and eventually a set I kept for three weeks straight without wanting to change it. If you’ve seen this trend online and wondered whether it’s actually wearable or just a photo-only look, here’s my answer after living with it for an entire season: it holds up fine in daily life, it photographs better than it looks in person, and once you know a handful of tricks, it’s far less intimidating than it looks in the close-up shots.
[Suggested image: overhead flat-lay of a hand with a matte cable-knit manicure next to a real knit sweater sleeve, for texture comparison. Alt text: “matte cable-knit winter nail design compared to real sweater texture”]
Below are sixteen versions of this trend, pulled from my own attempts, from watching Priya work, and from a few designs I sent her as screenshots and had recreated properly. I’m including the specific mistakes I made with each one so you don’t have to burn a Saturday afternoon finding them yourself the hard way.
Why Sweater Nails Actually Hold Up Through Winter?
Matte textured polish hides small chips noticeably better than a glossy finish does. That matters more than it sounds like it should once your hands are going in and out of wool gloves, hand sanitizer, and hot dishwater after every holiday dinner. My plain glossy red manicure used to show a chip by day four. My textured sets have gone eight to ten days before I noticed any real wear.
There’s also a lighting effect worth knowing about. Under warm indoor bulbs, a matte knit pattern catches small shadows the same way actual yarn does, which is part of why these designs photograph so well without a ring light or filter.
The texture also disguises everyday damage. Typing all day and unpacking grocery bags leave tiny surface scratches that show up under office lighting on a glossy nail. On a textured design, those same marks just blend into the pattern. A coworker asked how my manicure still looked fresh after ten days, and the real answer was less about polish quality and more about the texture doing the work for me.
There’s a seasonal fit to it too. Once everyone starts layering into actual sweaters and scarves, a glossy summer shade starts to feel slightly out of step, the same way a citrus candle feels wrong once it’s actively snowing. Switching to something textured and muted matches that shift without requiring any real effort.
One more practical point before the list: this is one of the more budget-friendly nail trends around. You don’t need rhinestones, an airbrush kit, or chrome pigment for most of these. A dotting tool, a thin detail liner brush, and two or three polish shades will get you through more than half of the designs below. I’ve spent more on a single set of press-ons than I spent on the tools that carried me through an entire winter of sweater nails.
The Designs:
1. Let It Snow:

A soft nude sweater-textured accent nail paired with a baby blue base and a hand-painted snowflake, finished with an ombré fade from nude into blue. The order matters here. Do the ombré first and let it cure completely under the lamp for the full 60 seconds before touching it again. I painted the snowflake first on my second attempt and it smeared into a pale blue smudge the moment I went back in with the ombré sponge.
2. Autumnal Comforts:

Burnt orange, mustard, and deep brown, with a matte sweater panel on one or two nails. The contrast between a matte base and a glossy top coat over the knit design is what actually sells the look. I use Sally Hansen Matte Finish for the base coats and keep the accent nail glossy with a regular top coat like Seche Vite, which also speeds up dry time between the two finishes.
3. Royal Blue:

A bold royal blue French tip across most fingers, with one or two intricate knit-pattern accent nails. This is the version I’d suggest to someone who likes the idea of sweater nails but doesn’t want full texture across all ten fingers. It reads as elegant rather than busy, and it’s genuinely quick to redo when your tips grow out, since only two nails need the detail work.
4. Grayscale Sweater:
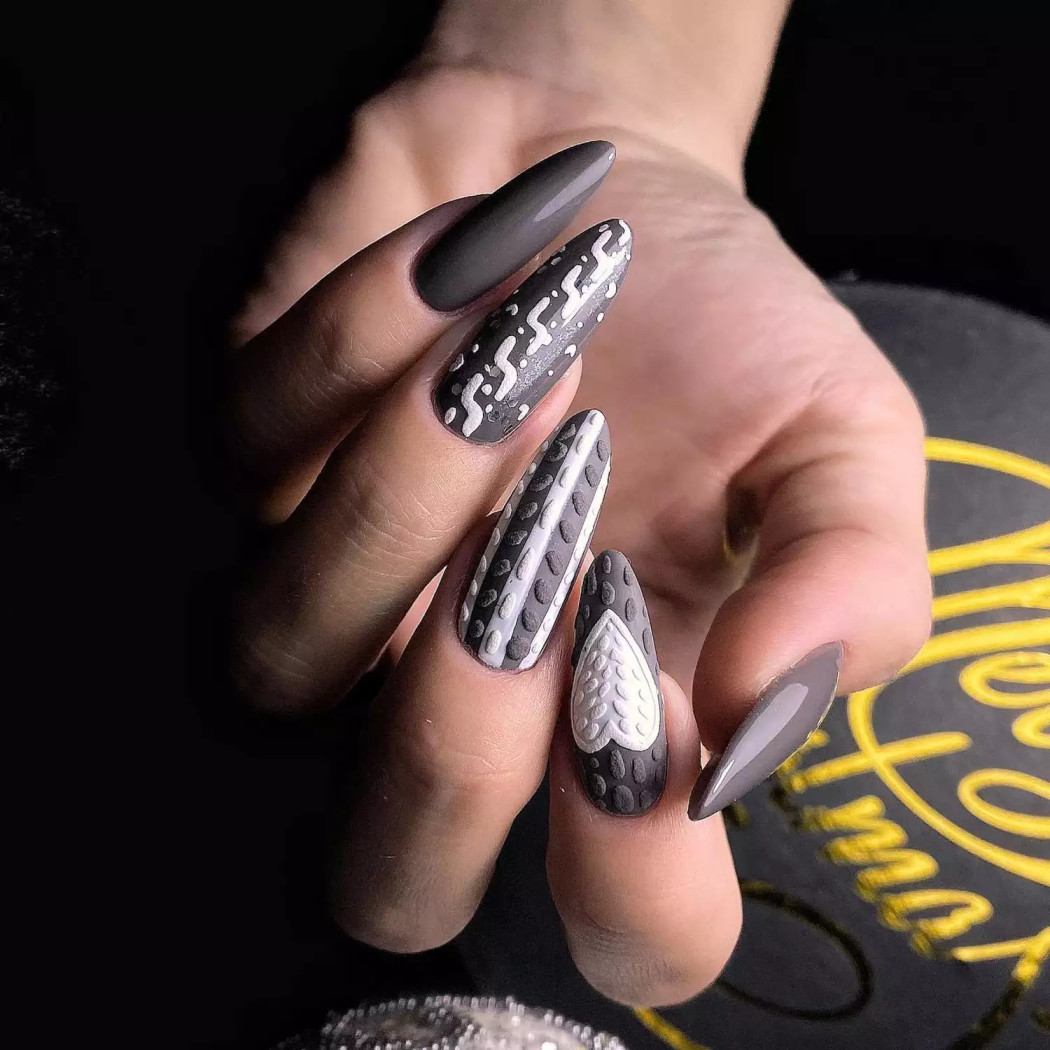
Each nail carries a different pattern, a classic knit, a cross stitch, and a simple sweetheart shape, all in shades of gray, with a glossy thumb and pinky to give the eye somewhere to rest. I wore this set for almost a full month, touching up the grown-out edges once around week two, and it matched literally everything in my closet without me having to think about it. If your workplace leans conservative about nail art, this is the design I’d point you toward first. It reads as put-together rather than trendy.
5. Chrome Sweater:
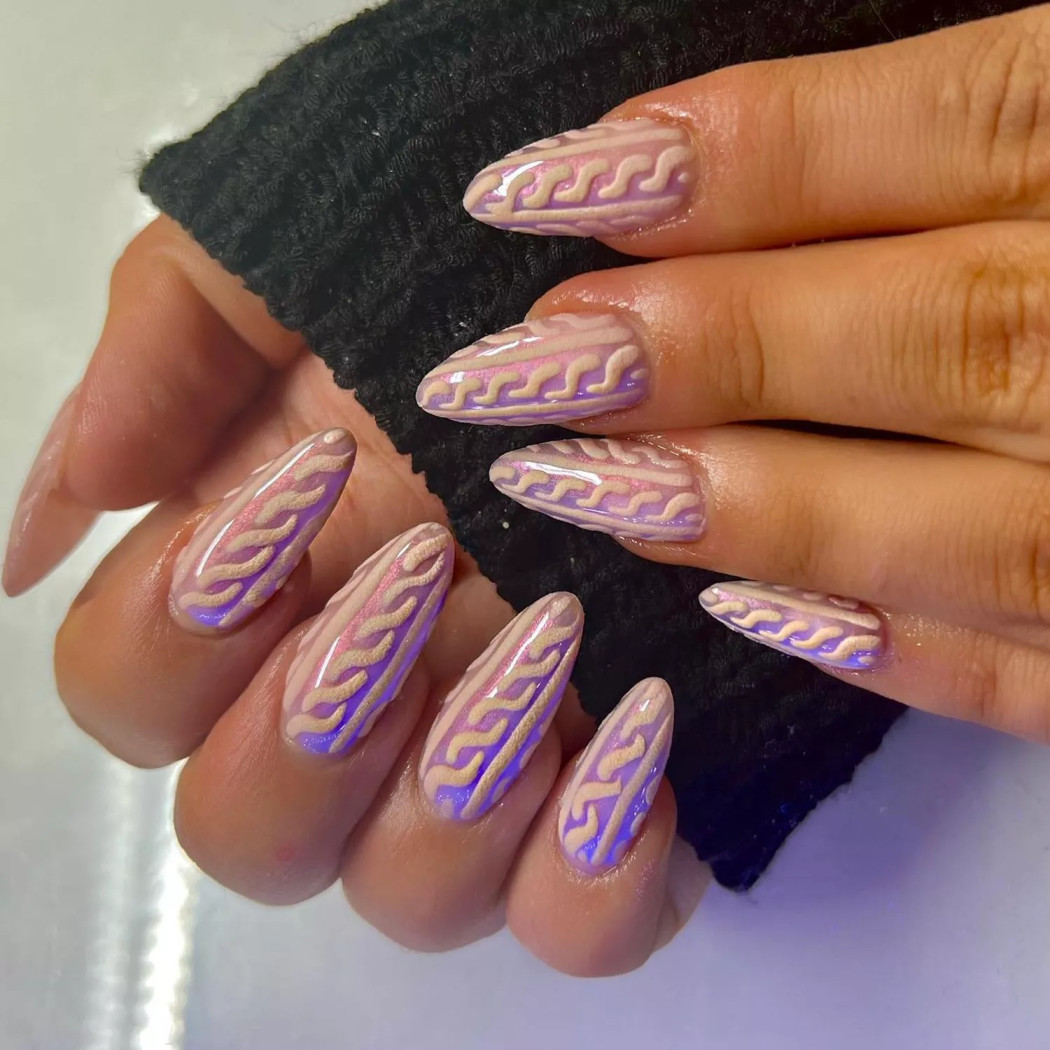
A chrome or unicorn powder base layered under a matte taupe knit pattern, creating a shifting, holographic effect depending on the angle of light. I was skeptical until I saw it under fluorescent office lighting versus warm lamp light, it genuinely looks like two different manicures. Chrome powder is messy to apply evenly at home without practice, since it needs to go on with a soft applicator over completely tack-free gel. This is one I’d actually recommend booking with a tech rather than attempting solo the first time.
6. Sweater With A Twist:
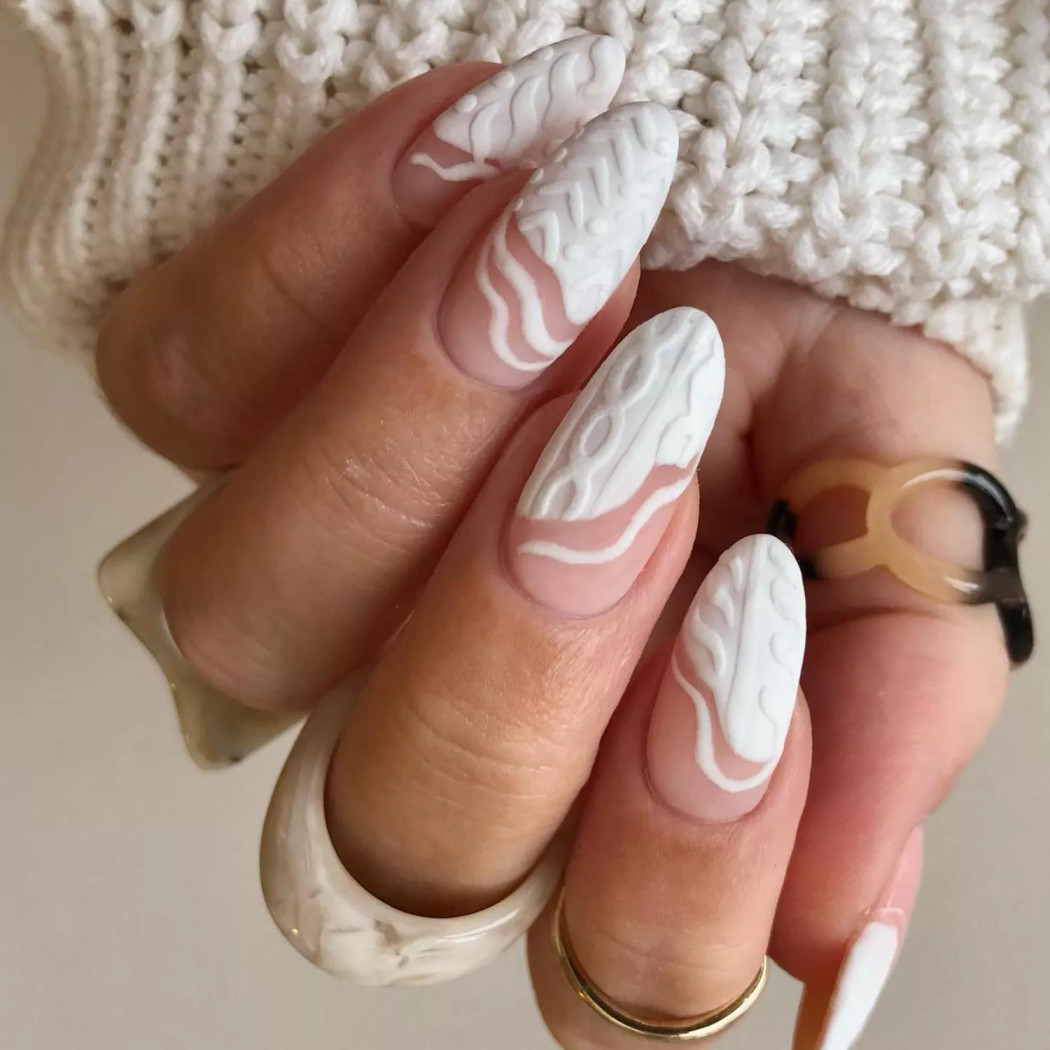
The classic knit pattern covers only half the nail, with the other half left as negative space or an abstract “unraveling” effect. It photographs beautifully but is genuinely harder to balance than it looks, since the divide line has to feel intentional rather than accidental. My first attempt looked less like artistic unraveling and more like I’d simply run out of polish partway through the nail.
7. Glitter Edition:

Fine glitter stripes woven into the knit texture, with one accent nail carrying more detail than the rest. Keep the busiest design to a single nail, usually the ring finger, and simplify the other nine. When I tried heavier detail across every finger, the whole hand looked cluttered instead of festive, and it was noticeably harder to keep clean under my other nails.
Best Sweater Nail Designs for Beginners:
If you’re newer to nail art, these next few are worth trying before anything with chrome powder, velvet flocking, or hand-painted characters.
8. Holiday Sweater:
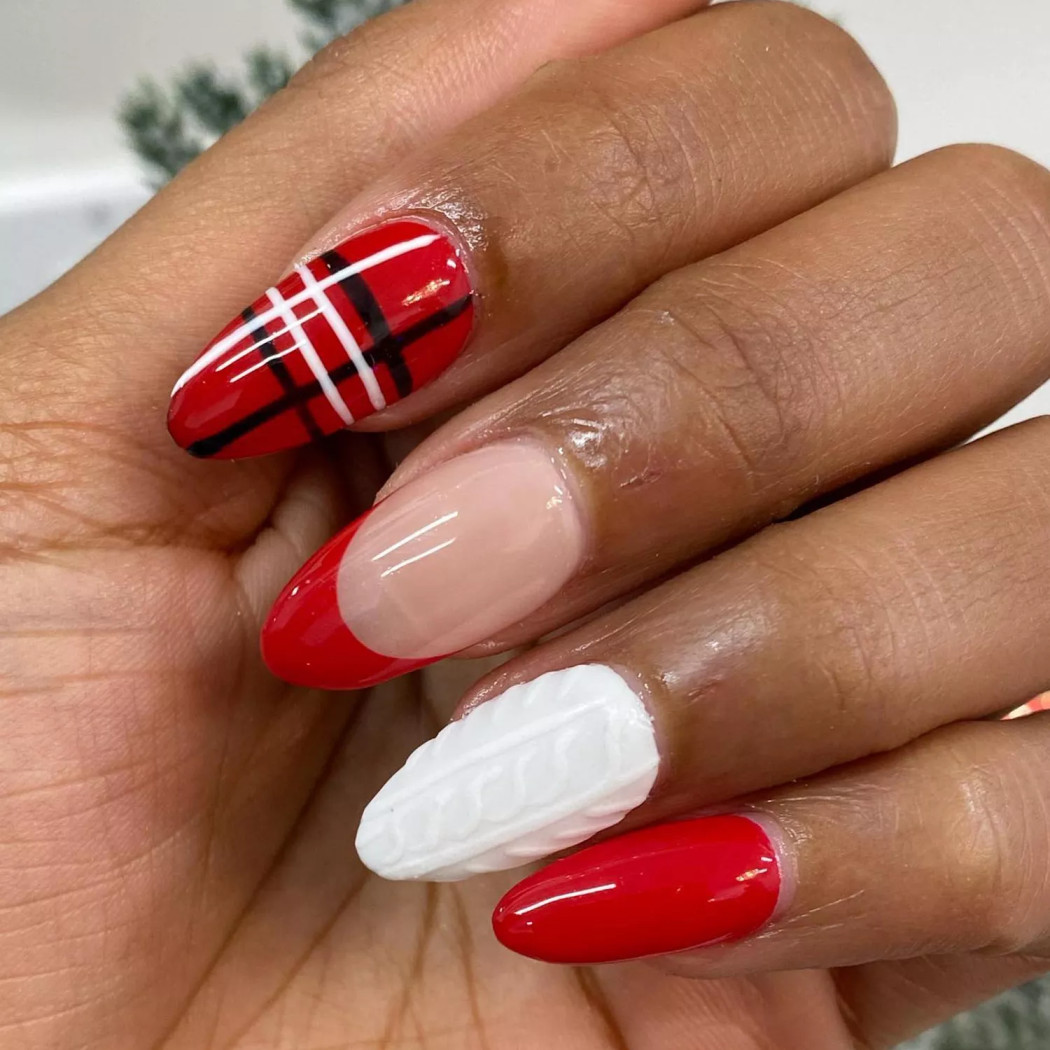
A white knit base with a small tartan plaid accent nail. Simple to execute, and it’s the one design on this list that actually coordinates with an outfit, which sounds minor until you’re deciding at 6pm whether your nails clash with a holiday party top.
9. White As Snow:

An all-white set with delicate snowflake detailing, glitter “stitching” along the sweater lines, and a classic French tip. I had this redone for a work holiday party specifically because it looks clean and understated from across a room but rewards a closer look with the small glitter details along each line.
10. Classic Plaid:

Not every sweater nail needs to be cable knit. Plaid is the wardrobe basic of nail art, familiar and rarely out of style. A touch of fine glitter traced along the plaid lines takes it from basic to intentional without adding much difficulty.
11. Pretty In Pink:
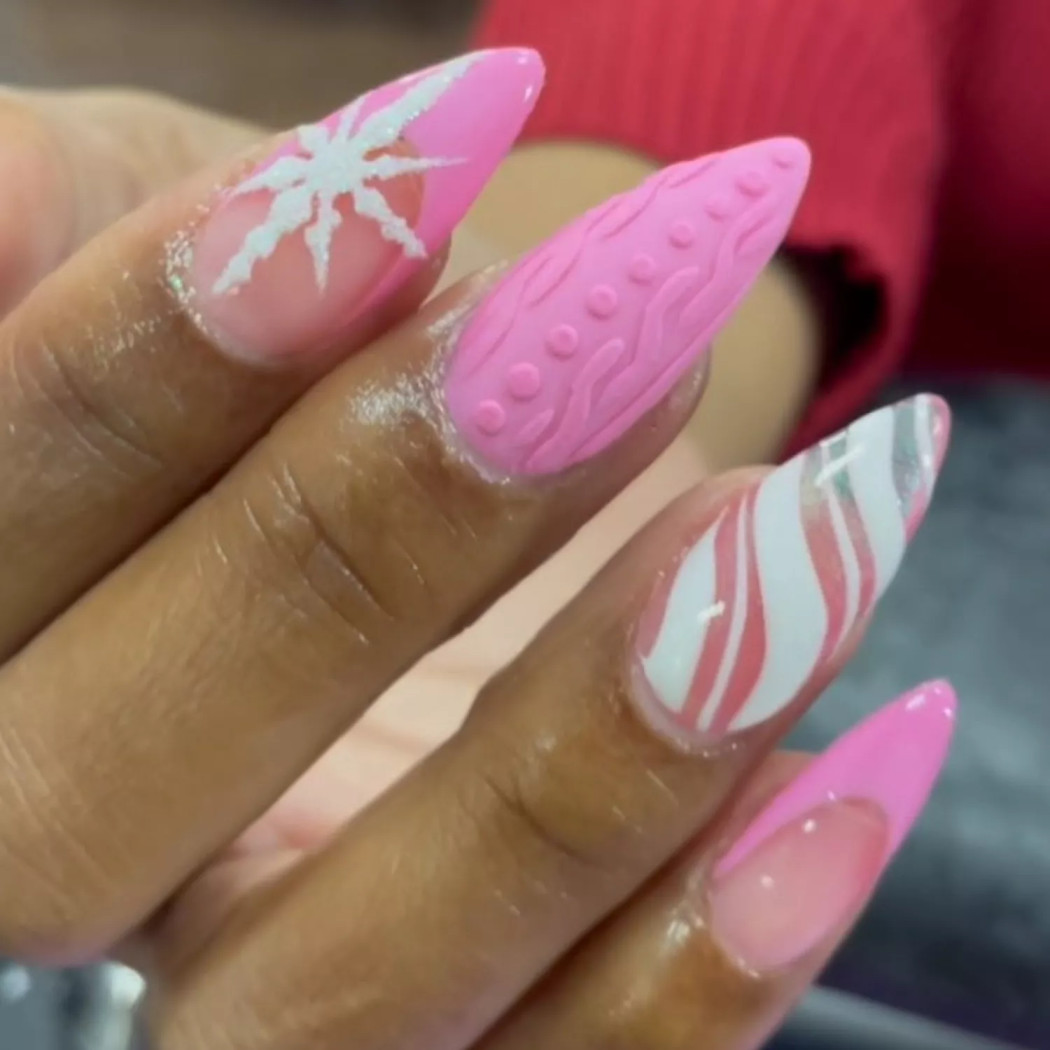
Bubblegum pink knit texture with a frosted snowflake and a candy-cane twist accent nail. This is one of the easiest designs on the entire list to recreate at home, since the shapes are simple, forgiving, and don’t require a steady hand for fine lines.
12. Duochromatic:

One hand in black, the other in a muted beige, both finished with matching matte sweater tips. This is a bolder look, and I’d only suggest it if your nail length and shape are close to even on both hands, since the strong contrast between the two colors makes any unevenness more obvious than it would be in a single-color set.
13. Holiday Party:

Cable knit and plaid combined, with a hand-painted reindeer on the central accent nail and candy cane stripes on the pinky. This is a lot of detail in one set, so treat it like an outfit: pick one statement nail (the reindeer) and keep the surrounding nails more restrained so the whole hand doesn’t compete for attention.
14. Subtle Sweater:

A light, milky base with fine textured stripes and a single thin gold line running through, like a hint of tinsel. This is the design I recommend most often to first-timers. It’s forgiving of imperfect symmetry and still reads clearly as a sweater design without needing advanced brush control.
15. Glowing Gingham:

Velvet-effect nails with snowflake detail on a couple of fingers, paired with abstract gingham on the rest. Velvet nail effects use a flocking powder applied over wet gel, not a texture faked with polish alone. If you want to try this at home, search specifically for a velvet nail powder kit rather than attempting to recreate the look with regular polish, since the finish is genuinely different and won’t match the photos otherwise.
16. Perfectly Plaid:
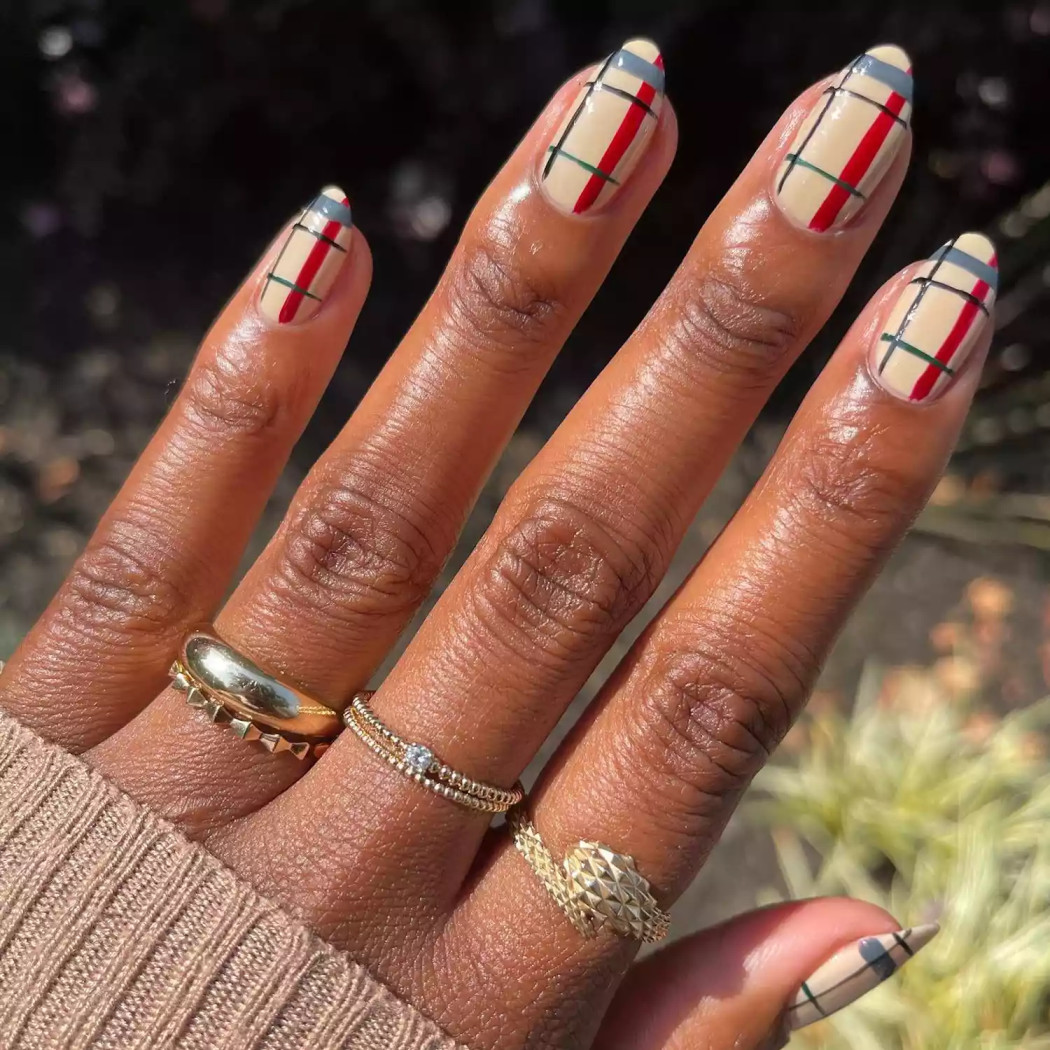
A taupe-to-banana gradient base under a classic red, green, and blue plaid overlay. This works for essentially any winter occasion, since the colors read as festive without tipping into costume territory.
How I Actually Recreate These At Home?
Step 1: Start with a clean, dry base. Push back cuticles and lightly buff the nail surface. Texture designs show every ridge and imperfection underneath, and skipping this step is where most of my early attempts went wrong.
Step 2: Apply your base color and cure it fully. With gel, that means the full recommended time under a UV or LED lamp, typically 30 to 60 seconds depending on the lamp and polish brand. Rushing this step is the single biggest reason texture designs smear later.
Step 3: Build the knit texture with a small dotting tool or thin detail liner brush. A cable knit pattern is really just overlapping V shapes with small connecting lines between them. Practicing on a nail wheel or a spare acrylic tip first will save you a redo on your actual hand.
Step 4: Seal the textured areas with a matte top coat, and use a glossy top coat on any solid nails. That contrast between matte and glossy is what makes the finished look pop rather than reading as flat.
Step 5: Finish with a protective top coat over everything, including the matte sections, so the design resists chipping at the tips through daily wear.
Nail Shape and Length: Does It Matter Here:
It does, more than I expected before trying this myself. Shorter, rounded nails tend to handle the busier knit patterns better, since there’s less surface area for a slightly uneven line to become obvious. On longer almond or coffin shapes, the pattern has more room to stretch, which looks great for simpler designs like the subtle milky sweater or classic plaid, but tends to make more detailed sets, like the reindeer holiday design, look stretched or distorted if the proportions aren’t planned out first.
If you’re trying this for the first time on natural nails that are on the shorter side, stick with designs 4, 11, or 14 from this list. They’re the most forgiving of a smaller canvas.
What This Actually Costs, Salon vs DIY?
Getting a detailed sweater nail set done at a salon typically runs somewhere between 55 and 90 dollars depending on your area and how much hand-painted detail is involved, plus a fill every two to three weeks. Doing it yourself, a basic starter kit with a dotting tool, a thin liner brush, a matte top coat, and two or three polishes usually costs under 25 dollars total, and those tools last through multiple manicures, not just one.
My honest routine ended up being a mix of both. I do the simpler designs, plaid, subtle stripes, solid knit accents, at home between salon visits, and save the ones with chrome powder or velvet flocking for when I’m already booked in for a fill.
Mistakes I Made So You Don’t Have To:
- Rushing the cure time between layers was the biggest one. Gel that isn’t fully set will drag and smear the moment a dotting tool touches it, and I learned this trying to finish a set five minutes before leaving for dinner.
- Using too thick a layer for the knit texture was the second. It looks fine going on, then dries into a lumpy, uneven surface. Thin layers, built up gradually, hold their shape far better.
- Trying five different designs across ten nails on my first attempt was the third mistake, and probably the most avoidable. One or two accent nails, with the rest kept simple, is both easier to maintain and, honestly, looks more expensive than a busy full set.
- Using a regular polish brush instead of a proper detail liner was another one. My early attempts at fine knit lines came out thick and uneven, more scribble than stitch. A liner brush, usually under ten dollars in most nail art starter kits, fixed that almost immediately.
- Skipping a real top coat because I was in a rush rounds out the list. Sweater nails without a proper seal chip fast right at the tips, which is exactly where hands take the most daily wear.
Removing and Maintaining Sweater Nails:
Because most of these designs use gel polish for durability, plan on a proper soak-off rather than peeling, which can damage the natural nail underneath the texture. Soak a cotton pad in acetone, wrap each nail in foil, and give it a full ten to fifteen minutes before gently pushing off the softened polish with a cuticle stick. Trying to rush this with peeling or scraping is how you end up with thin, weak nails going into your next set.
Between fills, a small drop of cuticle oil each night keeps the surrounding skin from drying out, which matters more in sweater nail season than any other time of year given how much time hands spend in dry, heated indoor air.
A Few Common Questions I Get Asked:
Does this work with regular polish or do I need gel?
Both work. Gel holds the texture longer and resists smudging while you’re actively working on it. With regular polish, work in a cooler room, since heat speeds up drying and makes fine lines harder to control.
How long does a sweater nail set actually last?
With gel and a solid top coat, I’ve gotten two to three weeks before needing a fill. Regular polish versions typically hold up close to a week before the tips show visible wear.
Can I do this on short nails?
Yes, and some designs look cleaner on shorter nails since there’s less room for the texture to look uneven. The grayscale and subtle sweater designs both translate well to a shorter length.
What if I mess up the texture halfway through?
Wipe it off with a lint-free wipe and a small amount of polish remover before it fully sets, then redo that one nail. Adding more polish on top of a smudged texture almost always makes it worse rather than better.
Is this trend suitable for acrylics or only natural nails?
Both work fine. The texture technique sits on top of the base color regardless of what’s underneath it, though acrylics with a slightly larger surface area can make fine detail work a little easier for beginners.
When To Just Book The Salon Instead?
The chrome sweater look and the velvet gingham set both use specialty products, chrome pigment and flocking powder, that take real practice to apply evenly. There’s no downside to bringing Priya, or your own tech, a screenshot and letting them handle those two. I keep the simpler designs for home between appointments and save the technical ones for when I’m already booked in for a fill.
Final Thoughts:
What stands out most about this trend after a full season of trying it is how flexible it actually is. You can keep it to one matte accent nail with a small snowflake, or go as detailed as a full plaid and reindeer set for a holiday party. Either way, it reads as intentional rather than overdone, which is rarer than it should be for a winter nail trend.
If this is your first time trying it, start with the subtle milky sweater design or classic plaid before working up to anything with chrome powder or velvet flocking. Future you, trying not to smudge a wet cable-knit pattern at eleven at night before an early flight, will be glad you started small.
If you end up recreating any of these, particularly the trickier ones, I’d genuinely be curious what worked and what didn’t for you. That’s usually how the better tips get passed around anyway, not from a tutorial, but from someone who already made the mistake and worked out the fix.