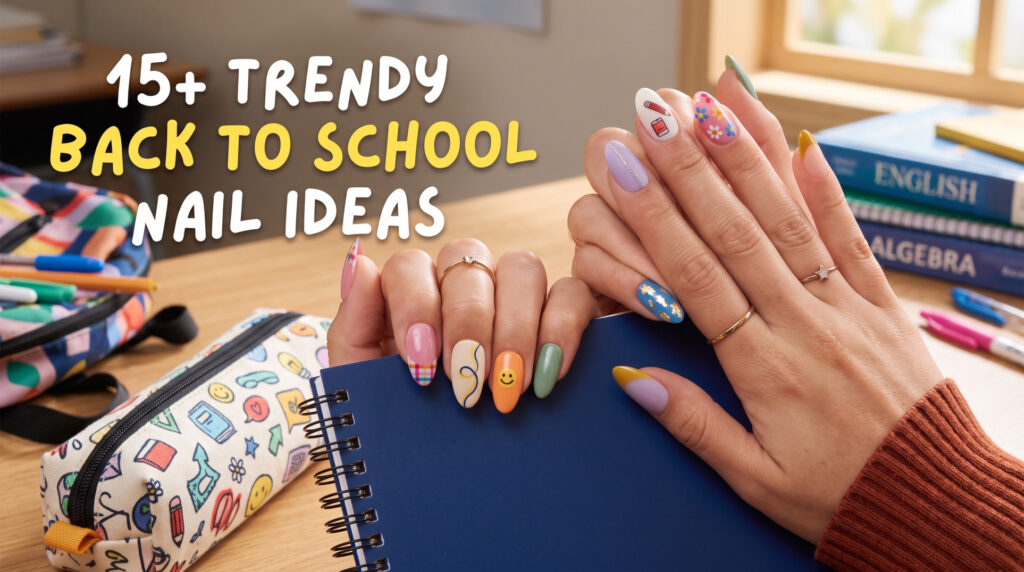
15+ Back to School Nail Ideas That Actually Held Up Through My First Week of Classes

I always tell myself the same thing every August: this year I’m going to have my life together before the first day back. New planner, new backpack, maybe even a color coded schedule I’ll abandon by week two. But honestly, the one thing that actually made me feel ready wasn’t any of that. It was sitting in my nail tech’s chair three days before classes started, scrolling through photos on my phone, trying to figure out a design that felt right for a new semester without looking like I tried too hard.

I’ve been getting my nails done before every school year since I started college, partly because it’s become a personal ritual and partly because I genuinely like having one small thing under control when everything else about a new semester feels unpredictable. Over the years that’s added up to a lot of appointments, a lot of trial and error, a couple of genuinely bad decisions, and a pretty solid sense of what actually survives real classroom life versus what just looks good for one photo.

If you’ve ever scrolled Pinterest the night before your appointment trying to pick something cute, something that photographs well for the first day of school post, but also something that can survive note taking, typing, opening a locker fifty times a day, and whatever your schedule throws at you, this is for you. Below is my real, lived through list of back to school nail ideas, along with the practical stuff nobody tells you until you’ve already ruined a manicure figuring it out yourself.

Why Your Back to School Nails Matter More Than You Think?

I used to think nails were just a small detail nobody really notices. Then my roommate pointed out that she remembers outfits way less than she remembers nails, because your hands are right there every time you’re texting, writing, or gesturing while you talk. That stuck with me. Your hands are basically on display all day in a classroom setting. You’re raising your hand, flipping pages, typing on a laptop, and people genuinely do notice. A good back to school manicure gives you a small confidence boost on a day that already feels like a lot. It’s not about vanity, it’s just one small thing that’s fully in your control on a day when very little else is.

What I Learned Before Getting Any of These Done?

Before getting into the actual designs, let me save you some trouble. I made a few mistakes early on that I don’t want you repeating.

Mistake one: booking too close to the first day: I once booked my appointment the night before school started, assuming it would be quick. It was a Sunday, the salon was slammed with other students doing exactly the same thing, and I ended up rushing through my design choice because I felt pressured by the line behind me. Book at least three to four days ahead if you can, so there’s zero stress and you actually get the design you wanted instead of whatever was fastest.

Mistake two: picking a design too delicate for actual school life: I once got gorgeous 3D floral tips, absolutely stunning in the mirror, but they were raised off the nail enough that typing on my laptop felt like playing a video game wearing oven mitts. By day two, one flower had already caught on my backpack zipper and popped clean off. If you type a lot, play a sport, or work with your hands during the day, factor in texture, not just the picture.

Mistake three: ignoring nail length for an actual school routine: Long stiletto nails look amazing in photos, but try opening a soda can, unlocking a locker, or typing a five page essay with them. Medium length almond or soft square shapes give you the look without the daily fight against your own hands.

Choosing the Right Nail Shape and Length for School Life:

This part usually gets skipped in nail inspiration posts, but it matters more than the actual design you pick. I’ve learned this the hard way more than once.

Short to medium almond or round shapes: are the safest choice if you’re taking a lot of notes by hand, using a laptop constantly, or doing anything lab related. They’re durable, comfortable, and still look polished without drawing attention to length instead of the actual art.

Squoval or soft square shapes: hold up well for anyone doing sports, art classes, or anything hands-on, since the flat edge resists snagging better than a pointed tip.

Coffin or stiletto shapes: look incredible for photos and events but are genuinely impractical for daily school use. I’d save these for a special occasion week rather than the actual first week back, when you’re doing the most typing and writing you’ll do all semester.

If you have naturally short or thin nails and don’t want extensions, almost everything on this list below can still be done with a nail art overlay on your natural nail length using gel polish. You just get a smaller canvas, which usually means simpler patterns like the daisy designs or a clean French tip work better than heavily dimensional 3D pieces.

Salon Gel, Acrylic, Dip Powder, or Press-On: What Actually Fits Back to School Life:

Not everyone wants a full salon appointment before school starts, and honestly, you don’t need one to get most of these looks.

Gel polish: is what I get for most of the designs below. It’s durable, dries fast under UV light, and handles daily wear well without chipping in the first few days like regular polish tends to. It usually lasts two to three weeks with a checkup appointment recommended if you notice any lifting near the cuticle.

Acrylic or hard gel extensions: are the better option if you want extra length or if your natural nails are prone to breaking. They’re sturdier for daily impact but do require more upkeep, usually a fill every two to three weeks.

Dip powder: is a solid middle ground. It’s strong, chip resistant, and a lot of nail techs can create detailed art with it, though it’s slightly less common for very fine 3D floral work compared to gel.

Press-on nails: are genuinely underrated for back to school season. Brands like Kiss, Static Nails, and Impress make pre-designed sets that mimic a lot of the florals and French tip looks on this list for a fraction of the salon price, and you can apply them the night before school starts in under twenty minutes. They’re a great option if you’re on a tight budget, don’t have a salon nearby, or just want to test a style before committing to it professionally.

Roughly What to Expect to Pay?

Prices vary a lot by region and salon, but here’s a general range based on what I’ve paid and seen friends pay for similar designs.

A simple gel manicure with one or two accent nails, like the daisy or gingham designs, usually runs somewhere in the 35 to 55 dollar range. Designs with multiple hand painted elements, like the picnic gingham with strawberries or the sunset wave blend, tend to run higher, often 60 to 90 dollars depending on how much time they take in the chair. Adding 3D elements or gems typically adds another 5 to 15 dollars on top of the base price. Press-on sets, by comparison, usually run 8 to 20 dollars for a full box and can be reused if you remove them carefully.

If cost is a factor, ask your nail tech which elements of a design take the most time. Often you can keep the overall look by simplifying just one or two nails instead of doing detailed art on all ten. Okay, now let’s get into the actual designs.

1. Starfish Beach Nails With a Nude Base:
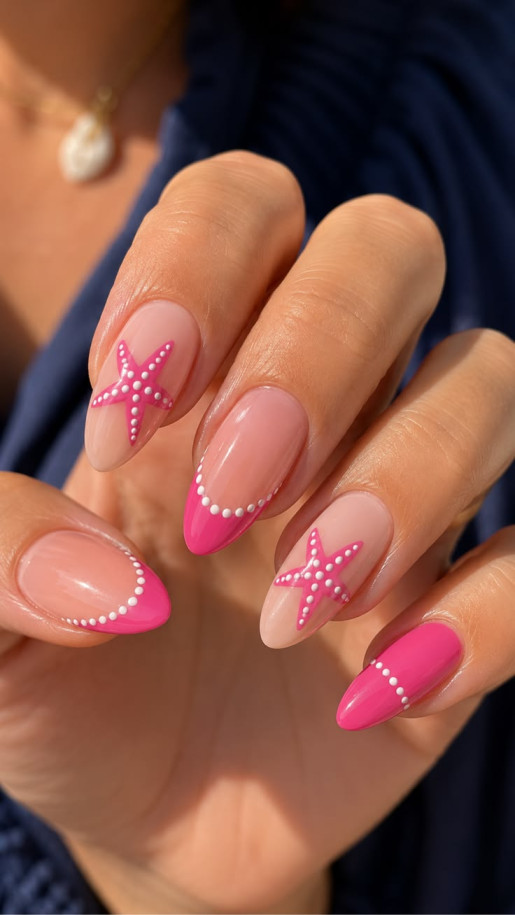
Starfish Beach Nails With a Nude Base
Save
Starfish Beach Nails With a Nude Base

This one surprised me because I wasn’t expecting a summer inspired design to translate so well into fall. Picture a soft nude base with hot pink French tips, and a couple of accent nails with tiny hand painted starfish and dot details. It works as a nice transition piece if you’re not ready to fully let go of summer. Tip from experience: ask your tech to keep the dots small and evenly spaced. Big clunky dots make the design look messy instead of intentional. This one also holds up well on shorter nails since the pattern doesn’t rely on length.

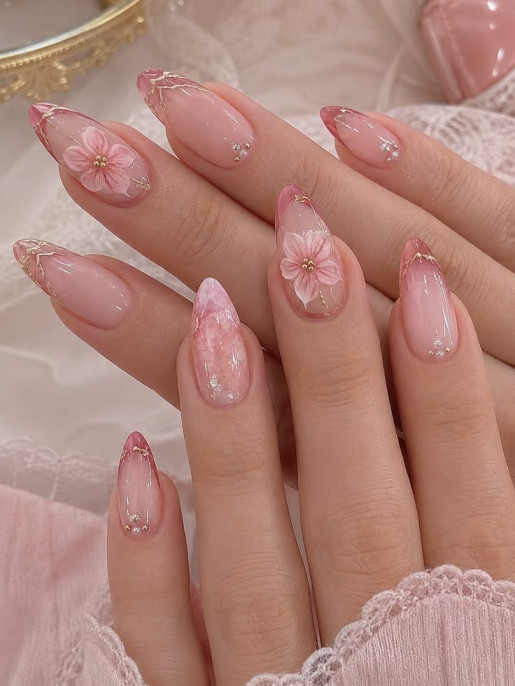
2. Soft Pink With Gold Floral Accents:

Soft Pink With Gold Floral Accents
Save
Soft Pink With Gold Floral Accents

I got a version of this for the first day of my sophomore year and I still think about it. A soft natural pink base, lavender glitter tips on a couple of nails, and delicate raised flowers with gold centers on the rest. It photographs beautifully in natural light, which matters if you’re taking that classic first day picture. The gold linework is what takes it from cute to elegant. If your salon does fine detail brush work, this is a great one to request specifically, and it’s worth asking to see their portfolio of similar linework before booking if this level of detail matters to you.

3. Gingham and Daisies for a Preppy Classroom Look:

Gingham and Daisies for a Preppy Classroom Look
Save
Gingham and Daisies for a Preppy Classroom Look

If your style leans preppy or cottagecore, this one’s for you. A creamy beige base, one nail in a soft white gingham pattern, another with tiny white daisies and light brown centers, and the rest kept simple and glossy so the pattern nails stand out. I wore something close to this during a semester with a lot of presentations, and it held up well because most of the nails were solid glossy color, which resists chipping far better than an all over pattern does. If you’re worried about durability, this ratio, mostly solid with one or two accent nails, is the safest structure to request.

4. Hot Pink With Floral French Tips:

Hot Pink With Floral French Tips
Save
Hot Pink With Floral French Tips

This is for anyone who wants their nails to be the main character. A bold hot pink base paired with white tipped nails featuring pink and fuchsia flowers with a tiny gold gem center. One caution: gel gems can catch on fabric, especially hoodie pockets. Ask your tech to seal the gem completely under a thick topcoat so it doesn’t snag or fall off during the first week, when your hands are in and out of pockets more than usual.

5. Lemon Yellow Tips With Little Daisies:

Lemon Yellow Tips With Little Daisies
Save
Lemon Yellow Tips With Little Daisies

There’s something about pastel yellow that feels like a genuine fresh start rather than the generic idea of one. This design uses a soft pink base with creamy yellow French tips, and a couple of nails get tiny daisy flowers scattered across them. What I like about this one specifically is how forgiving it is if you’re growing your nails out. Because the tips do the visual work rather than the whole nail, you can get a fill in two weeks and the design barely shows regrowth compared to a solid color base.

6. Classic French With 3D Flower Accents:

Classic French With 3D Flower Accents
Save
Classic French With 3D Flower Accents

Sometimes you want something timeless with a bit extra. Most nails stay a subtle sheer pink with a classic white tip, and one or two accent nails get small 3D flowers with fine detailing. Heads up, 3D elements add real bulk. If you’re not used to textured nails, give yourself a full day to adjust to the feel before diving into heavy handwriting or a lot of typing, since your first instinct is usually to type the way you always have, and the raised texture throws that off at first.

7. Pastel Rainbow With Gold Detailing:

Pastel Rainbow With Gold Detailing
Save
Pastel Rainbow With Gold Detailing

This became my go to for the first week of any semester because it goes with literally everything I own. Baby blue, blush pink, and soft yellow spread across different nails, each with its own gold detail: sun rays on one, tiny stars on another, a floral motif elsewhere. If you can’t decide on just one color, this design lets you have several without looking chaotic, as long as the gold linework ties everything together visually. Ask your tech to sketch a rough layout on paper first if you’re picky about which color goes where, it saves redo time in the chair.

8. Blush Pink With Pearl Accents:

Blush Pink With Pearl Accents
Save Blush Pink With Pearl Accents

This is the quiet luxury version of back to school nails. A sheer blush base, subtle gold streaks on a few nails, and one or two with a raised floral design topped with a tiny pearl. I wore this during exam week once, and having nails that looked put together genuinely helped me feel less frazzled, even when everything else felt chaotic. It’s a good pick if you want something that reads as polished in a professional setting too, like an internship interview that happens to land during the semester.

9. Simple Daisies on a Nude Base:

Simple Daisies on a Nude Base
Save Simple Daisies on a Nude Base

Sometimes the simplest option really is the best one. A translucent nude base with one clean white daisy painted on each nail, golden yellow center included. This is genuinely the design I recommend most to friends who are nervous about nail art for the first time, because it’s low commitment, inexpensive relative to more detailed looks, and forgiving if a nail chips since one small daisy is easy for almost any tech to touch up on short notice. It also happens to be one of the easiest designs to recreate at home with a fine detail nail art brush and two polish colors if you want to try it yourself before committing to a salon version.

10. Pastel Daisies Across Different Shades:

Pastel Daisies Across Different Shades
Save Pastel Daisies Across Different Shades

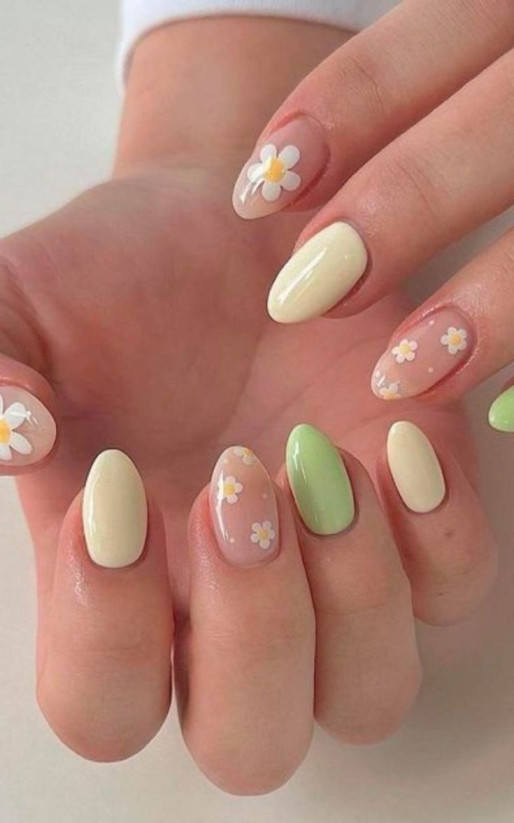
This design plays with color more than most others on the list. Pale yellow on some nails, mint green on others, clear nude with hand painted daisies mixed throughout. This one takes longer in the chair because of the color changes between nails, so plan for a longer appointment, usually closer to ninety minutes instead of the standard hour. It’s a strong option if you genuinely can’t settle on one palette and want to see a few pastels side by side before deciding which one you like best for future manicures.

11. Sunflower Inspired Nails:

Sunflower Inspired Nails
Save Sunflower Inspired Nails

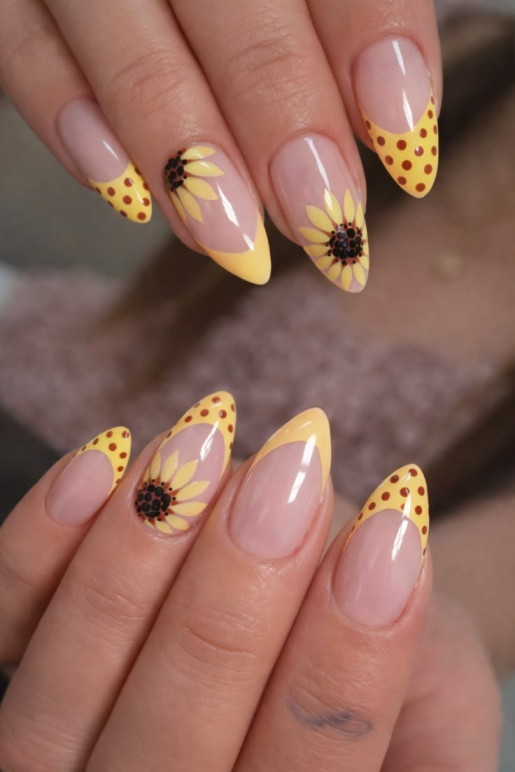
Sunflowers carry a specific kind of optimism that fits the start of a new school year well. This design mixes actual painted sunflowers on some nails with playful yellow tips and tiny red polka dots on others, over a soft pink sheer base.

It’s a good pick if you want something a little more unexpected than the standard daisy or floral request, since fewer people think to ask for sunflowers specifically, and it tends to stand out more in a room full of similar French tip manicures.

12. Orange and Daisy Combo:

Orange and Daisy Combo
Save Orange and Daisy Combo

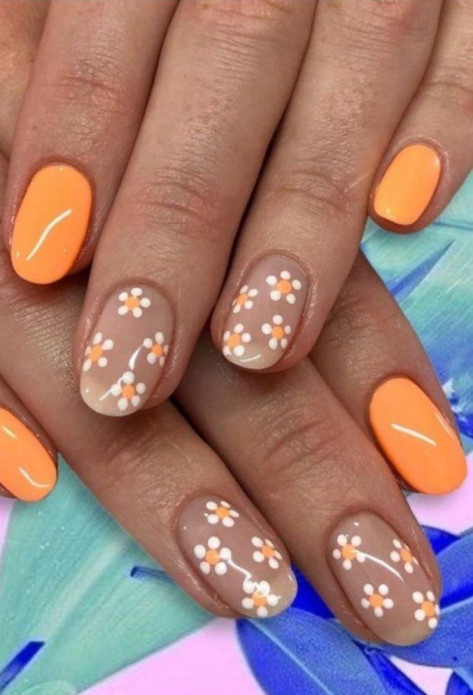
If you lean toward warm tones, this one’s worth trying. A few nails in bold glossy orange, balanced with nude nails covered in tiny white daisies with orange centers. This design has that end of summer, start of fall feeling that fits the calendar timing of back to school particularly well, and the solid orange nails are quick to touch up if you chip one, since your tech only needs to match one color rather than repaint a detailed pattern.

13. Sunset Waves With Daisy Accents:

Sunset Waves With Daisy Accents
Save Sunset Waves With Daisy Accents

Probably the most artistic option on this list. A nude base with two daisy nails, and the rest featuring a wavy gradient blend of pink, orange, and yellow that reads like a small sunrise on your nail. This takes a genuinely skilled hand to blend smoothly without harsh lines between colors, so bring a reference photo and ask specifically whether your tech has done gradient wave work before booking. Not every salon specializes in this technique, and it shows quickly if they don’t.

14. Picnic Gingham With Strawberries:

Picnic Gingham With Strawberries
Save Picnic Gingham With Strawberries

This design has a nostalgic, almost storybook feeling. Red and white gingham on one nail, hand painted strawberries on another, tiny daisies scattered on a few more, all over a soft pink nude base. This is one of the most detailed designs on the list, which means it usually costs more and takes longer, often close to two hours depending on how many hand painted elements you include. If budget or time is tight, ask your tech to limit the strawberry and gingham detail to just two accent nails instead of spreading it across the full set, you’ll get the same visual effect for less.

15. Sage Green With Daisies and Gingham:

Sage Green With Daisies and Gingham
Save Sage Green With Daisies and Gingham

For anyone wanting something different from the usual pinks, this sage green base with white daisies, a leafy branch accent, and a green and white gingham nail is a nice change of pace. It has a calm, earthy feeling that still fits the back to school mood, just quieter. This palette also tends to age well through the semester if you keep the same base color for fills, since sage green doesn’t show wear or slight discoloration the way very pale pastels sometimes do after a couple of weeks.

How I Actually Pick Which Design to Get?

After trying most of these over the years, here’s the process I actually use now.

Common Mistakes to Avoid:

Skipping cuticle oil: I ignored this for too long and my manicures always looked tired by week two. A cheap cuticle oil pen from the drugstore extends the life of a manicure more than most people realize, and takes about ten seconds a day.

Waiting too long between fills for gel or acrylic: Waiting until something actually breaks means more damage to your natural nail underneath, and usually a longer, more expensive repair appointment than a routine fill would have been.

Picking a design purely based on trends instead of your actual daily life:  A beautiful design that annoys you every time you try to text isn’t worth it, no matter how good it looks in photos. Match the design to your week, not just to what’s popular that month.

Not asking about price before sitting down: especially for detailed hand painted designs. Some of these run well above a basic manicure price, and it’s better to know upfront than be surprised at checkout.

Assuming every salon can execute every style equally well: Gradient blending, fine floral linework, and 3D elements are genuinely different skill sets. If a specific design matters a lot to you, ask to see photos of that tech’s past work in that exact style before booking.

Frequently Asked Questions

Are long nails allowed at school?

Most schools don’t have a strict rule against nail length, but some programs with lab work, sports, instruments, or hands-on classes do have practical restrictions. If you’re unsure, check your school’s dress code or ask a teacher in that specific program before committing to length.

How long does a back to school manicure typically last?

Gel manicures usually last two to three weeks before needing a fill. Regular polish lasts closer to five to seven days before chipping. Press-on nails typically last one to two weeks depending on how well they’re applied and how much water exposure they get.

What’s the best nail design for someone who’s never had nail art before?

Simple daisies on a nude base or a classic French tip with one small floral accent nail are the easiest starting points. They’re low cost, quick to redo if something goes wrong, and don’t require advanced technique from your nail tech.

Can I do any of these designs at home?

Yes, especially the simpler ones like the single daisy design or basic French tips. You’ll need a fine detail nail art brush, two or three polish colors, and a good topcoat. Press-on sets are also a reliable at-home option if freehand painting isn’t your strength.

What if my nails chip during the first week of school?

Most salons offer a short grace period, often three to five days, for free touch ups on a design that chipped unusually early. Ask about this policy when you book so you know what to expect if something goes wrong.

Final Thoughts:

Back to school season already comes with enough pressure: new classes, new schedules, sometimes a whole new campus to figure out. Your nails shouldn’t be one more source of stress. Whatever design speaks to you from this list, pick something that fits your actual week, not just something that looks good in a photo for five minutes before you’re back to real life.

I’ve had manicures that lasted the whole semester and ones that chipped by Wednesday, and honestly, the ones I remember fondly weren’t always the most complicated. Sometimes it was just a simple daisy on a nude base that made me smile every time I looked down during a boring lecture. Find your version of that, and you’re already off to a good start this year.

Matilda

Style Nexus is written and run by Matilda. What started as a personal interest in fashion, beauty, and everyday styling grew into this site a place to share outfit ideas, beauty tips, and style inspiration with anyone looking for a bit of direction on their own look.

Leave a Reply

Your email address will not be published. Required fields are marked *